Section 3. Setting Up Your Respondents
This section explains how to work with sets of respondents in SurveyGold. It explains how to create and maintain groups of respondents. It explains how to define which respondents are used with your survey.
Important: If you are conducting an online survey or an in-person survey, it is not necessary to enter respondent data before conducting a survey. In this case SurveyGold captures individual respondent data as each online or in-person survey is processed. The majority of the content describe in this section pertains to conducting phone-based surveys. If you are conducting online surveys, paper-based surveys, in-person surveys or kiosk surveys, it is not necessary to perform the activities in this section.
All respondents are added to the Respondent Master List group. Once they exist in the Respondent Master List group, you may choose to create another respondent group and give the group a meaningful name (such as Customers, Employees, etc.) You may then copy selected respondents from the Respondent Master List group to your newly created respondent group. This ability to create your own respondent groups is provided to help you better manager your respondents by organizing them into meaningful groups.
In addition to the standard respondent data (such as name, address, phone, email, etc.), SurveyGold provides the ability to create up to four custom fields. This is helpful if you need to collect identification information (such as account number, student ID, etc.) Each custom field can be up to 255 characters in length.
Tap or click images to enlarge them.
Creating Respondents in the Respondent Master List
This section describes how to add a respondent to the Respondent Master List group via the Setup Survey tab. Once added to the Respondent Master List group, a respondent may be added to a survey and/or a respondent group.
This section describes how to add a respondent to the Respondent Master List group via the Setup Survey tab. Once added to the Respondent Master List group, a respondent may be added to a survey and/or a respondent group.
|
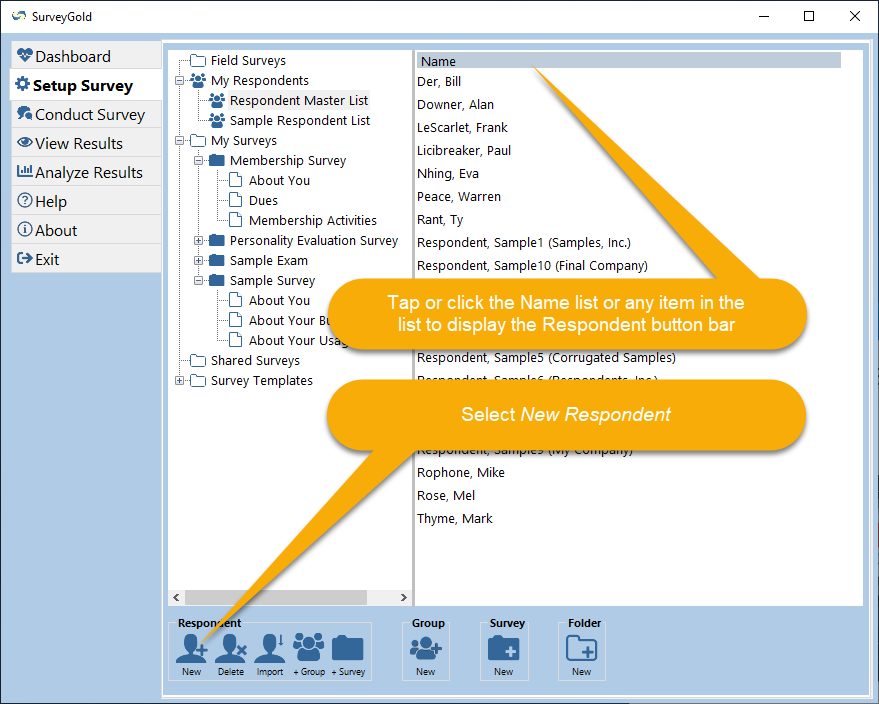
Step 1 - From the Setup Survey tab folder, select the "My Respondents" folder. Then select + to expand the folder contents. Select "Respondent Master List". This displays a list of respondents to the right. Next, select the first respondent in the list on the right. Then select New Respondent in the button bar.
|
|
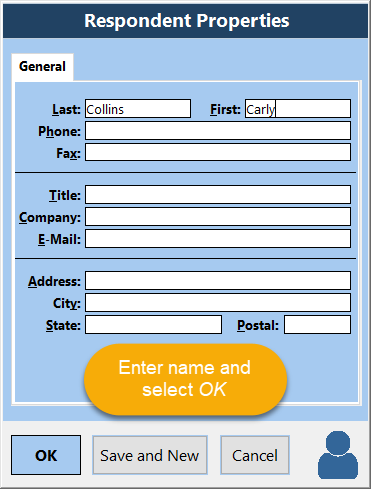
Step 2 - Enter your new respondent's last name and first name. These are required entries. All other respondent data is optional. Select OK to save changes. This closes the Respondent Properties Sheet and returns control to the Setup Survey tab folder. Your new respondent is displayed in the list on the right.
Productivity Note: If you have more than one new respondent to enter, select Save & New instead of the OK button. This causes the respondent properties sheet to save your new respondent, clear the properties, and remain open for you to enter another respondent. |
Using Custom Respondent Data Fields
SurveyGold provides four custom respondent data fields for each survey. These can be used for custom data such as account number, member number, spouse name, etc. Each custom field can hold up to 255 characters of data. Setting up these fields is quick and easy.
SurveyGold provides four custom respondent data fields for each survey. These can be used for custom data such as account number, member number, spouse name, etc. Each custom field can hold up to 255 characters of data. Setting up these fields is quick and easy.
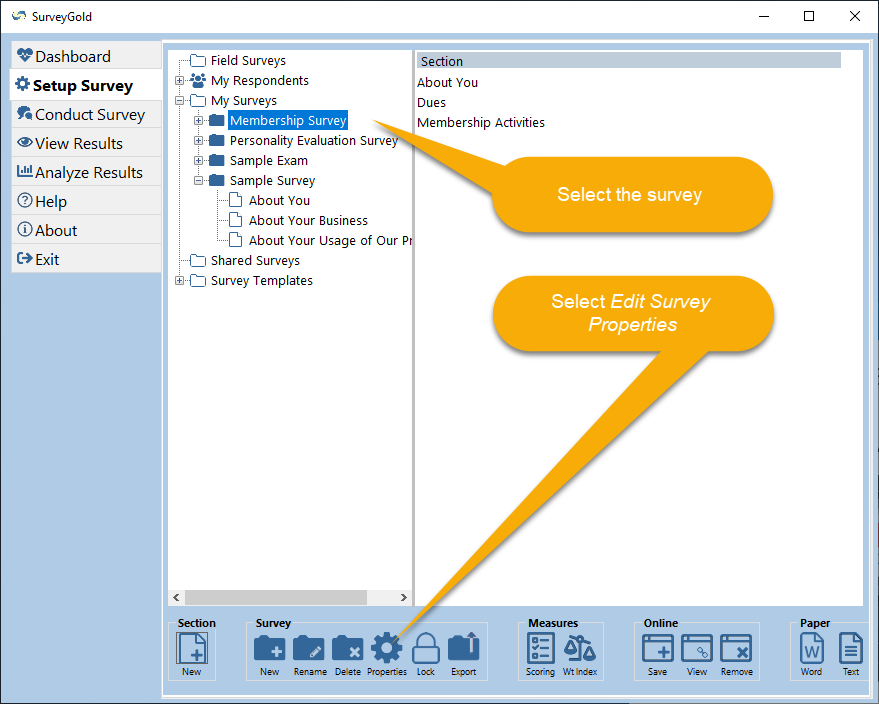
|
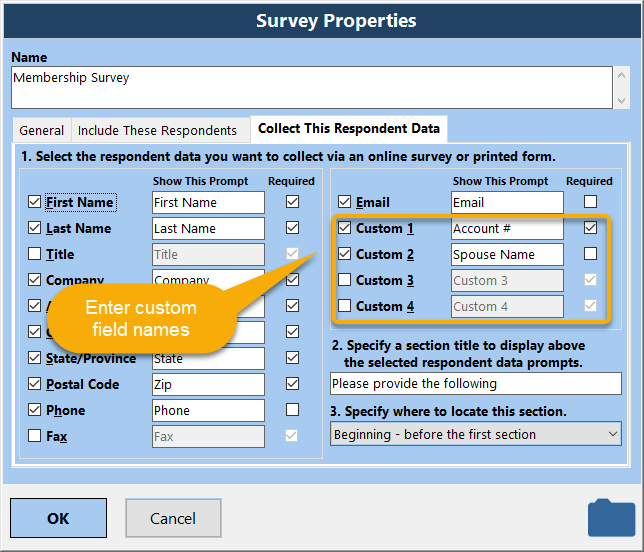
Step 2 - Select the Collect This Respondent Data tab. In any of the four custom fields, enter the name of your user defined field(s). In this example, we are using the first custom field as the Account # field and the second custom field as the Spouse Name field. Select OK to save these changes.
Later, when you print your survey or save your survey in any form, these custom fields appear in the respondent data section. Note: Each survey can have its own unique custom fields. This means that in one survey custom field #1 could record, for example, account number while in another survey custom field #1 could record spouse information. Note: You can rename the custom fields at any time without affecting any data you may have entered. For example, if you decide to rename custom field 1 to Account Number, rather than Account #, you can do so at any time and your custom data would be retained. |
Importing Contacts from Microsoft Outlook™
If you have Microsoft Outlook™, SurveyGold can quickly create a list of known respondents by importing any or all of your Outlook™ Contacts into your SurveyGold Respondent Master List. For each Contact you choose to import, their name, address, phone number and email address are stored in SurveyGold.
This productivity feature is intended to use the Contact information you already have in Outlook™. Simply said, it keeps you from having to re-enter potentially massive amounts of known respondent data. SurveyGold automatically enables this feature if Outlook™ is installed on your computer.
Note: Contact name, address, phone number and email address data from is copied from Microsoft Outlook™ into your SurveyGold Respondent Master List. If you subsequently change or delete any Contact data in Outlook™, it will not be reflected in the SurveyGold Respondent Master List.
|
Step 1 - From the Setup Survey tab folder, right-click on the "Respondent Master List" in the folder view on the left side. Select Import Contacts From Outlook™ from the popup menu item.
|
|
Step 2 - Wait while SurveyGold reads information on each Outlook™ Contact. A small progress indicator appears in the foreground. It disappears after SurveyGold completes reading all Outlook™ Contacts.
|
|
Step 3 - Next, you specify which of your Outlook™ Contacts to include in your Respondent Master List. Select a Contact name from the Outlook™ Contact List. Then drag it and drop it on the list on the right. The Contacts that you put in the list on the right side will be included in your Respondent Master List.
Productivity Note: You can select more than one Contact from the Outlook™ Contact List by holding down the CTRL key and selecting a Contact item. You can select a range of Contacts by holding down the SHIFT key and selecting a Contact item. |
|
Step 4 - Select OK to save changes. This closes the Import Outlook™ Contacts Sheet and returns control to the Setup Survey tab folder. The Contacts you selected now appear in your Respondent Master List.
|
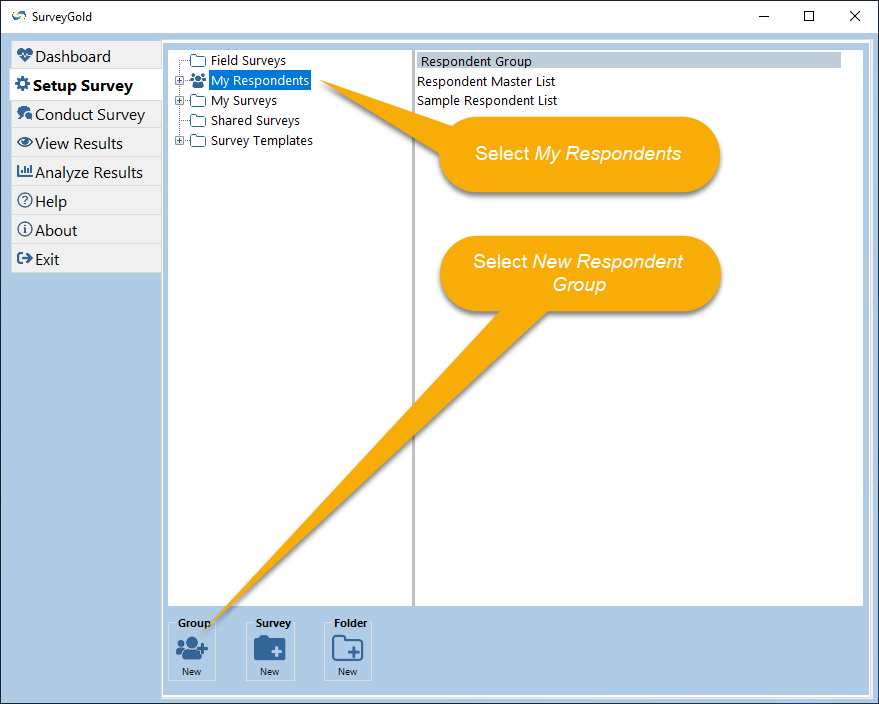
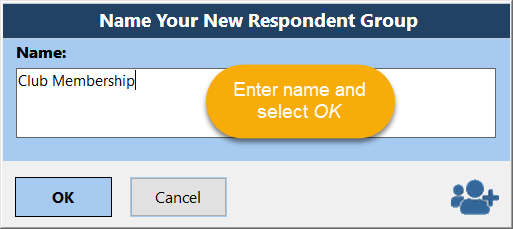
Creating a New Respondent Group
A respondent group is a set of known or unknown respondents. You create a respondent group to define a set of respondents that you may want
to survey multiple times over some period. The following steps show you how to create a new respondent group. (We will show you how to create anonymous respondents in a later section.)
|
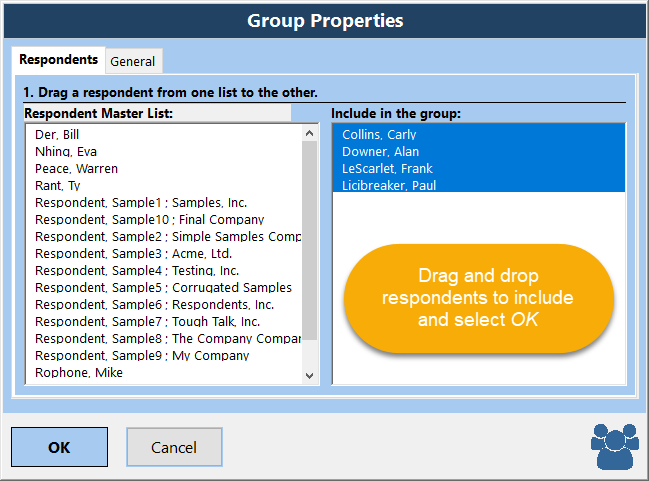
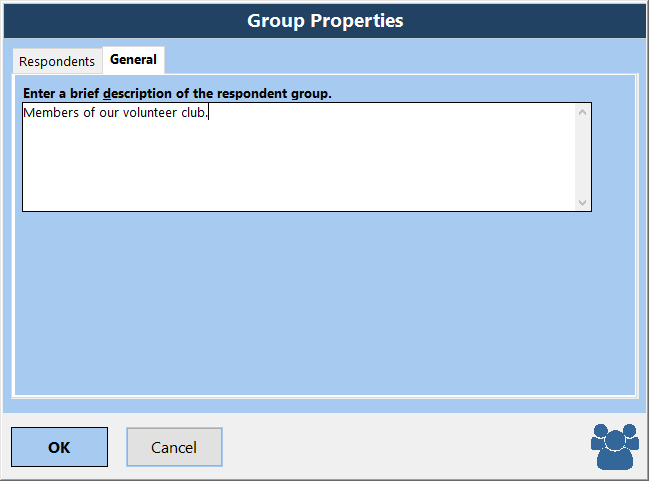
Step 3 - The Respondent Group Properties Sheet opens next. Here you can specify which respondents from the Respondent Master List to include in this respondent group. You can also enter a description of the respondent group.
Note: You can access Respondent Group Properties and change properties at any time after you create a respondent group. We are presenting it here just to make you familiar with it. Select a respondent name from the Respondent Master List. Then drag and drop the name to the list on the right. The respondents that you put in the list on the right side are included in your respondent group. In this example four respondents are selected from the Respondent Master List to include in the group. Note: The Respondent Master List used in our example contains only three respondents. The Respondent Master List would normally contain many more respondents. Productivity Note: You can select more than one respondent from the Respondent Master List by holding down the CTRL key and selecting a respondent item. You can select a range of respondents by holding down the SHIFT key and selecting a respondent item. |
Creating Anonymous Respondents
An "anonymous" respondent is a respondent whose name and contact information is unknown. This respondent typically completes a survey questionnaire form without providing a name or contact information.
Creating anonymous respondents is helpful when you have received a large quantity of completed paper survey forms and want to pre-create the respondents before doing the data entry via Conduct Survey.
Note: The Conduct Survey tab provides an easy way to create anonymous respondents one at a time. Select the Create New Respondent button.
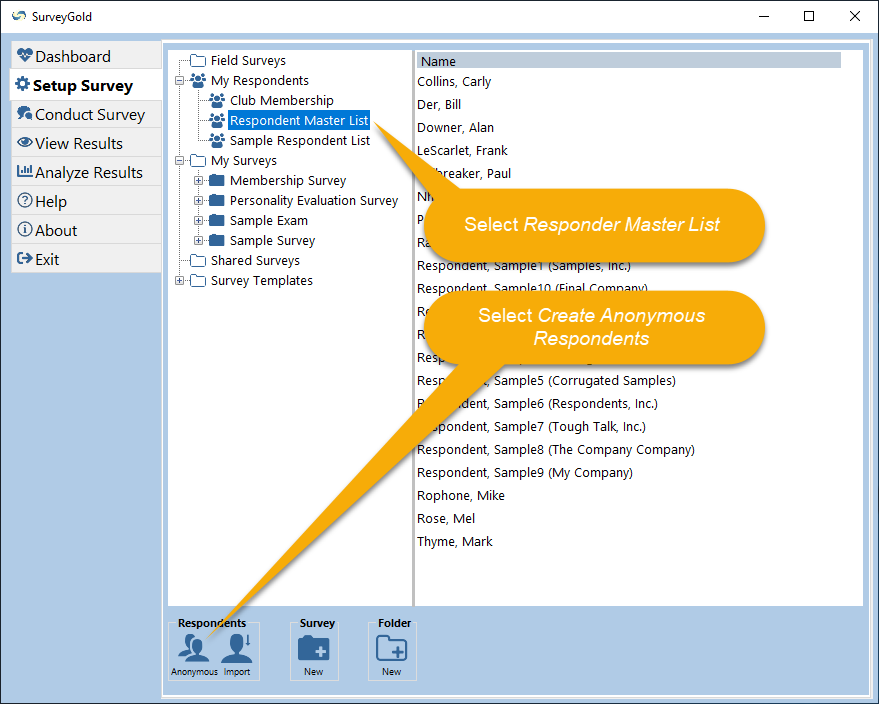
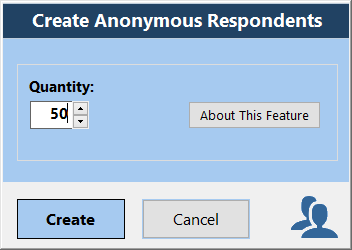
SurveyGold provides a quick way to create a multiple anonymous respondents. Simply select the Respondent Master List. Then specify how many anonymous respondents to create in that respondent group.
Note: The only thing that makes an anonymous respondent anonymous is the word "Anonymous" in the last name. There is nothing more to it than that. You can make an anonymous respondent into a known respondent by simply replacing the respondent's name via either the respondent properties sheet in the Setup Survey tab or the Verify Information tab in the Conduct Survey tab.
Associating Respondents with a Survey
Once you have created known respondents or anonymous respondents, you can easily associate them with a particular survey.
Note: You must associate respondents with a survey in order to conduct a survey. In other words, no respondents will appear in your survey in the Conduct Survey folder unless you associate respondents with your survey. You can choose whether or not to specify which respondents are associated with a particular survey before conducting the survey. Alternatively, you can defer this until you conduct the survey by selecting the Create New Respondent button from in the Conduct Survey tab.
Note: The Conduct Survey tab provides an easy way to associate a respondent with a survey. Simply select the Create New Respondent button.
|
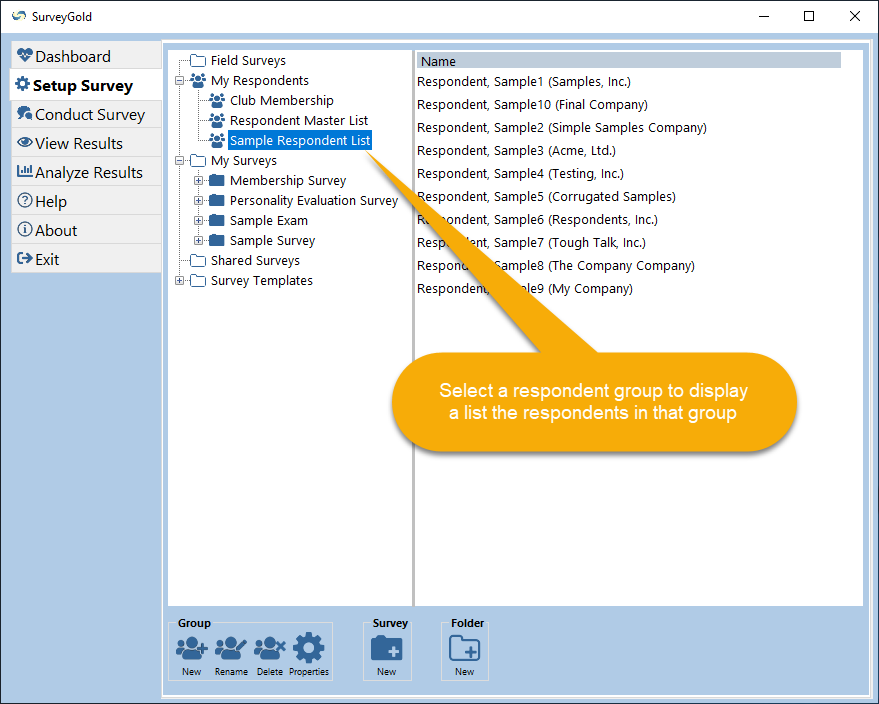
Step 1 - From the Setup Survey tab, select a respondent group. This lists all respondents in that respondent group in the list on the right. In this example, we will assign respondents from the Sample Respondent List to the Sample Survey. So we will select the Sample Respondent item on the left to display all the respondents in that group.
|
|
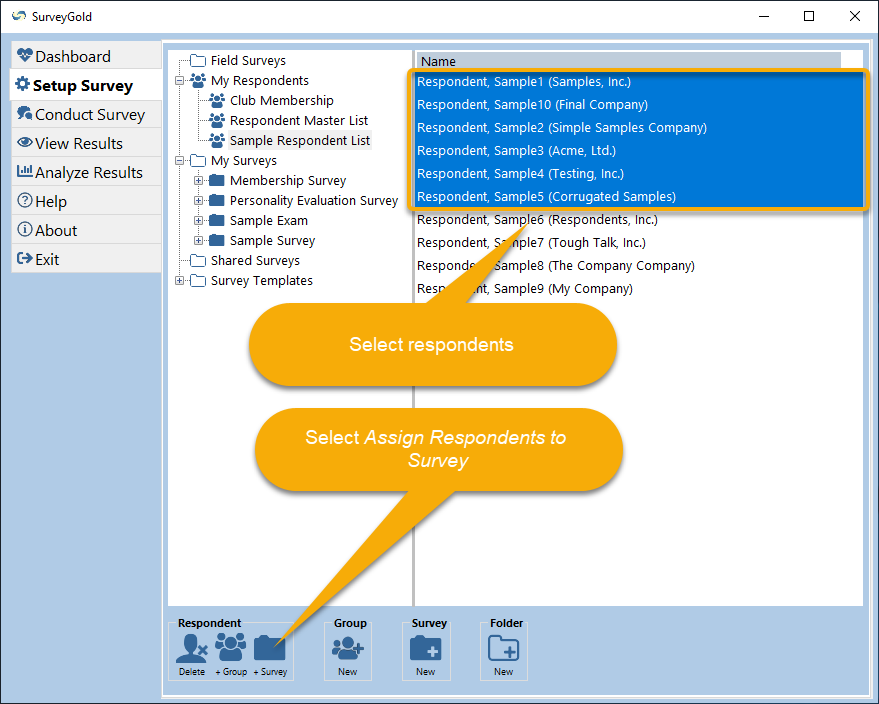
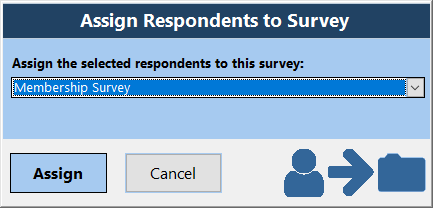
Step 2 - To associate respondents to a survey, begin by selecting the respondents from the list. Then select Assign Respondents To Survey from the button bar.
Productivity Note: You can select more than one respondent from the Sample Respondent List by holding down the CTRL key and selecting a respondent item. You can select a range of respondents by holding down the SHIFT key and selecting a respondent item. |

