
Section 8. Preparing Your Online Survey
This section explains how to prepare your survey for use as an online survey with SurveyGold.
Tap or click images to enlarge them.
Tap or click images to enlarge them.
Tweaking the Appearance of Your Online Survey
SurveyGold provides you with many options for customizing the look your online survey. The options that you specify here take effect when you save your survey as an online survey form.
SurveyGold provides you with many options for customizing the look your online survey. The options that you specify here take effect when you save your survey as an online survey form.
Formatting Response Choices as Radio Buttons, Check-boxes, Drop-Down Menus
For questions with response choices, you can customize how those response choices appear.
For questions with response choices, you can customize how those response choices appear.
|
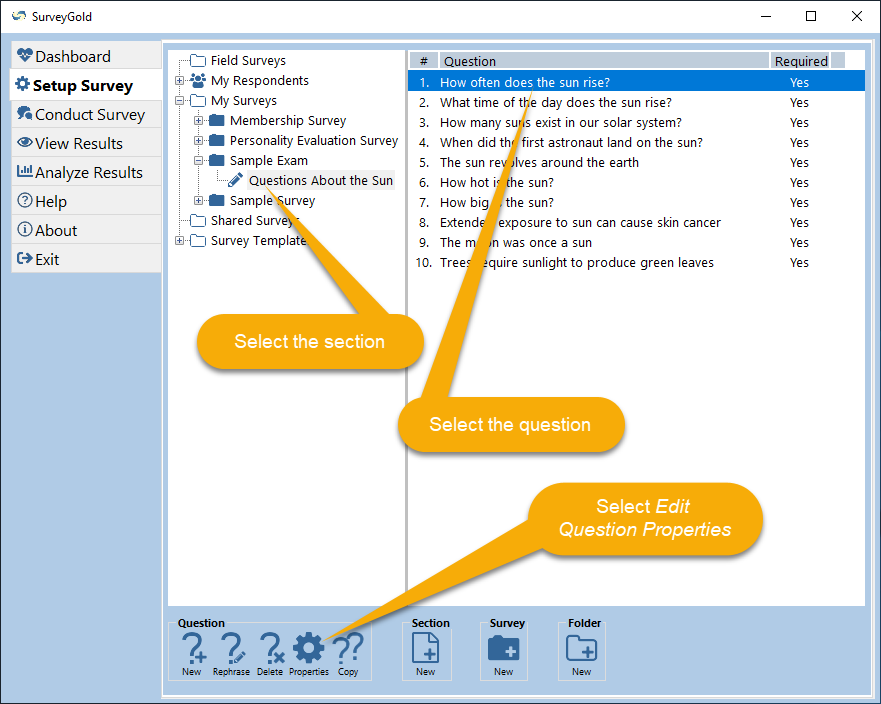
Step 1 - From the Setup Survey tab folder, select the section in the view on the left side. This causes all questions contained in the select section to appear in the list on the right. Select a question and select Edit Question Properties in the button bar.
|
|
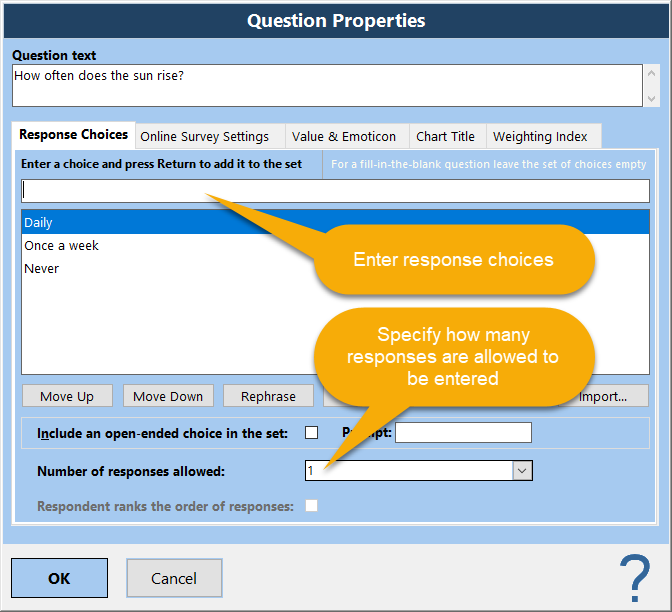
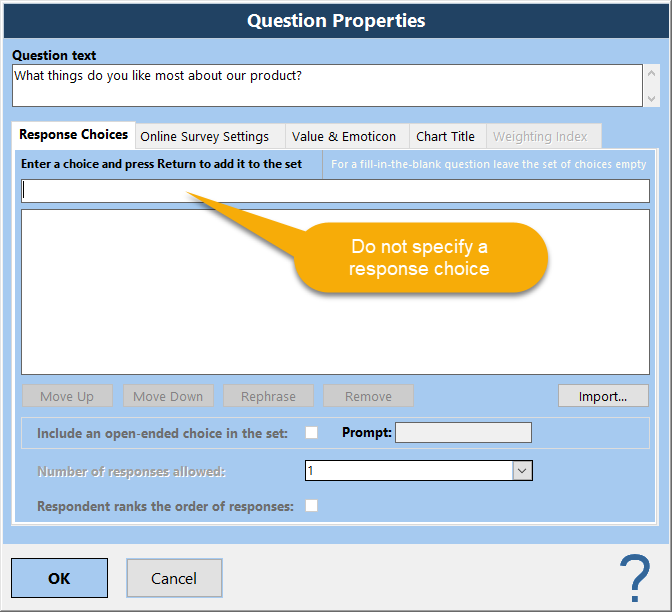
Step 2 - In the Question Properties Sheet, specify response choices and the number of responses required in the Response Choices tab.
|
|
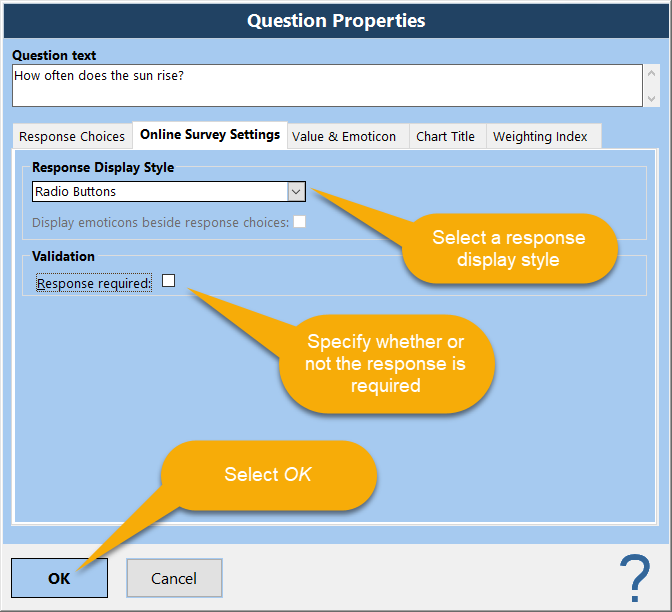
Step 3 - Select the Online Survey Settings tab.
If the number of responses required in the Response Choices tab is set to "1", then the choices for online survey display styles are either radio buttons or a drop-down menu. If the number of responses required in the Response Choices tab is set to "Any number of responses" or any number other than "1", then the choices for online survey display styles are either check-boxes or a drop-down menu allowing multiple responses. You can also specify whether or not you want a response to the question to be required in an online survey form. Specifying the question as required means that the respondent cannot submit responses until a response is provided to this question. Productivity Note: You can also quickly specify whether or not a question is required via the Setup Survey tab by right-clicking on a question and selecting the Required Question or Optional Question menu option. select OK after specifying your preferences. |
Formatting Fill-in-the-Blank Questions
For questions without choices, you can also customize how those responses appear via the Response Style tab in the question properties sheet. Here you can specify the number of responses required.
If "Only one response" is selected, the response field can be displayed as one-line text box or a scrolling text box. If you require a specified number of responses, enter that number and SurveyGold creates that number of response fields as either a one-line text box or a scrolling text box depending upon which you choose. If "Any number of responses" is selected, SurveyGold creates three response fields as either a one-line text box or a scrolling text box depending upon which you choose.
|
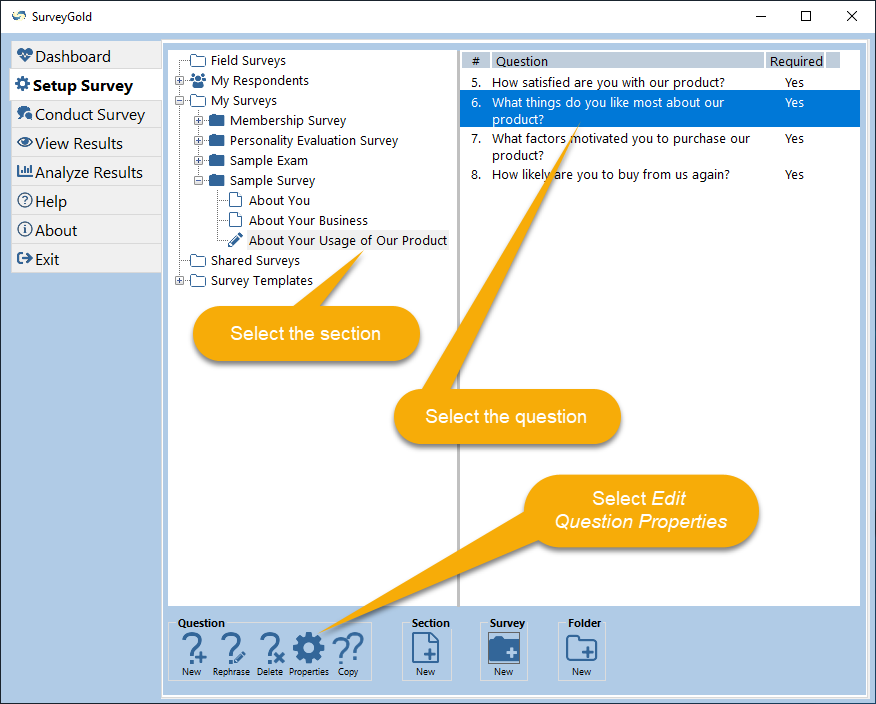
Step 1 - From the Setup Survey tab folder, select the section in the view on the left side. This causes all questions contained in the select section to appear in the list on the right. Select a question and select Edit Question Properties in the button bar.
|
|
Step 2 - In the Question Properties Sheet, specify no response choices in the Response Choices tab to make your question receive a fill-in-the-blank response.
|
|
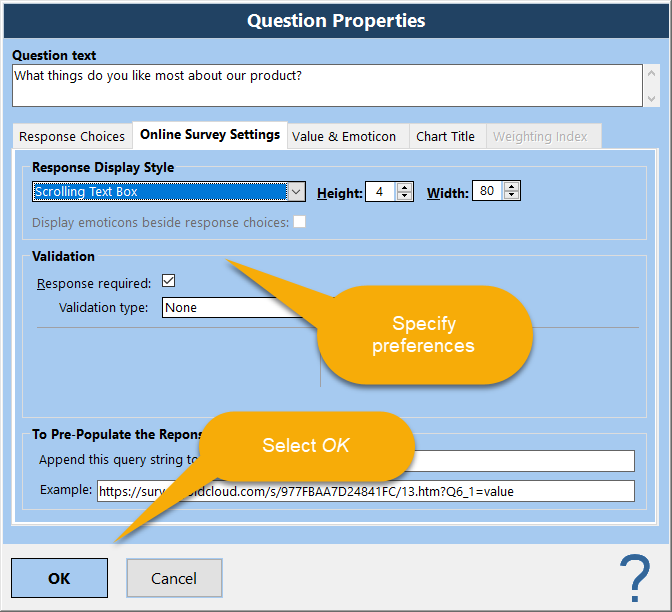
Step 3 - Select the Online Survey Settings tab.
If the number of responses required in the Response Choices tab is set to "1", then the fill-in-the-blank field can be displayed as either a one line text box or as a scrolling text box. You can adjust the height and width of the text boxes. This affects how the many lines high and how many characters wide the text boxes will appear for this question in the online survey form. However the text box can still have up to 16,000 characters entered into it. If the number of responses required in the Response Choices tab is set to "Any number of responses" or any number other than "1", then the choices for online survey display styles are either a one line text boxes or as a scrolling text boxes. The number you specify here determines how many such text boxes the online survey form will have for this question. If you specify "Any number of responses", the online survey form will contain three text boxes. You can also specify whether or not you want a response to the question to be required in an online survey form. Specifying the question as required means that the respondent cannot submit responses until a response is provided to this question. Productivity Note: You can also quickly specify whether or not a question is required via the Setup Survey tab by right-clicking on a question and selecting the Required Question or Optional Question menu option. Select OK after specifying your preferences. |
Creating a Matrix of Questions with the Same Response Choices
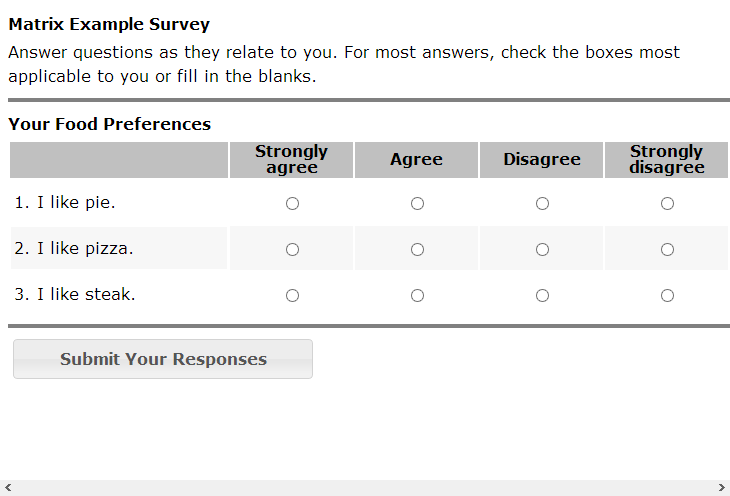
The Section Properties Sheet includes an option that enables a feature that creates a matrix using all questions in the section when all of the questions have identical response choices. When saving an online survey, this creates a matrix whereby the questions appear in separate rows and the response choices appear at the top of each column. The respondent can select a response choice using a radio button (if only one response is allowed) or a check-box (if more than one response is allowed.)
Here is an example of a matrix of questions
Personality Evaluation Questions
Strongly agree |
Agree |
Neither |
Disagree |
Strongly disagree |
|||
|
|||||||
|
|||||||
|
|||||||
|
|||||||
|
|||||||
|
Note that all of the questions have the exact same response choices. The matrix feature works when the following conditions are met:
The recommended way to create a matrix of questions in a survey is as follows:
- The matrix option is checked in the Section Properties Sheet
- Every question in the section has the exact same set of response choices
The recommended way to create a matrix of questions in a survey is as follows:
|
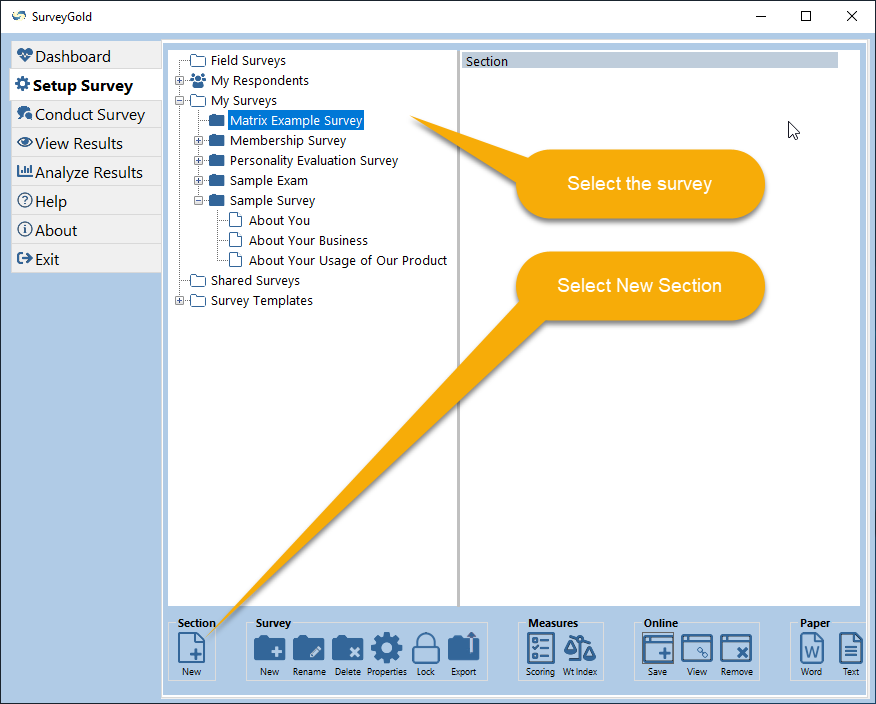
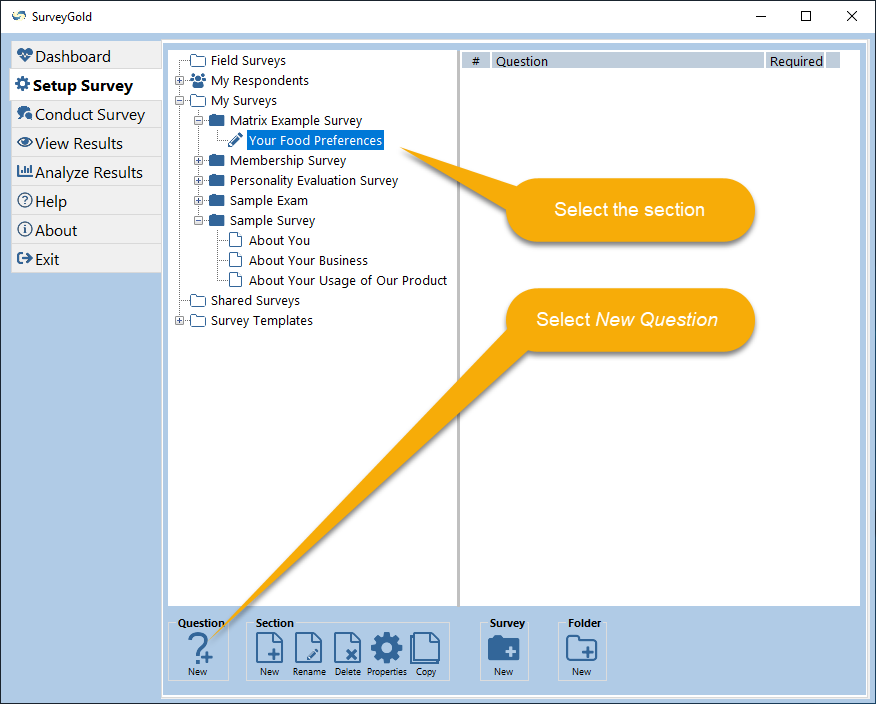
Step 1 - From the Setup Survey tab folder, select your survey in the view on the left side. Select New Section in the button bar.
|
|
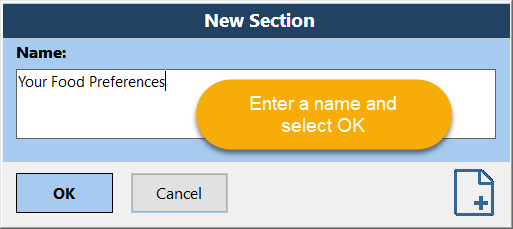
Step 2 - When the Name Your New Section window appears, enter the section name in the window and select OK.
|
|
Step 3 - With the newly created section selected, select New Question in the button bar.
|
|
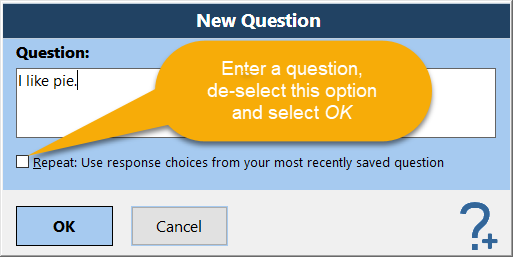
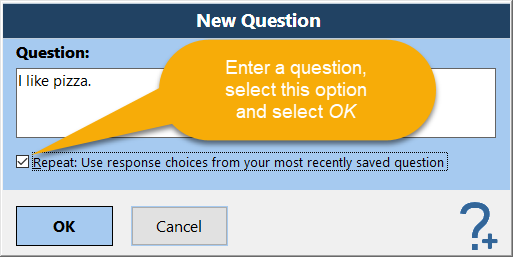
Step 4 - When the Enter Your New Question window appears, enter your question text. Make sure that the option
"Repeat: Use response choices from your most recently saved question" is not selected and select OK. |
|
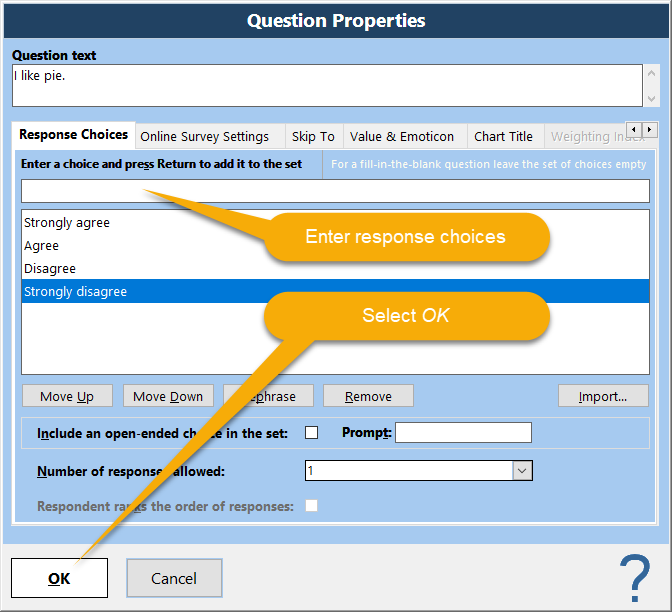
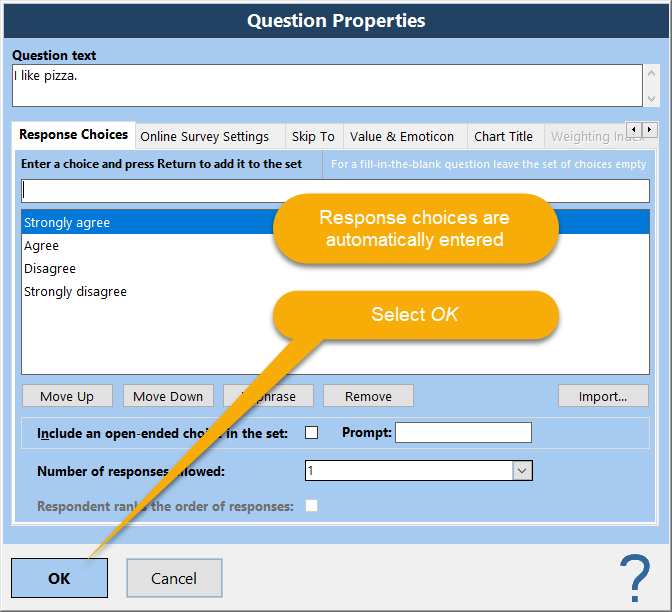
Step 5 - In the Question Properties Sheet, enter your response choices and select OK to create your question.
|
|
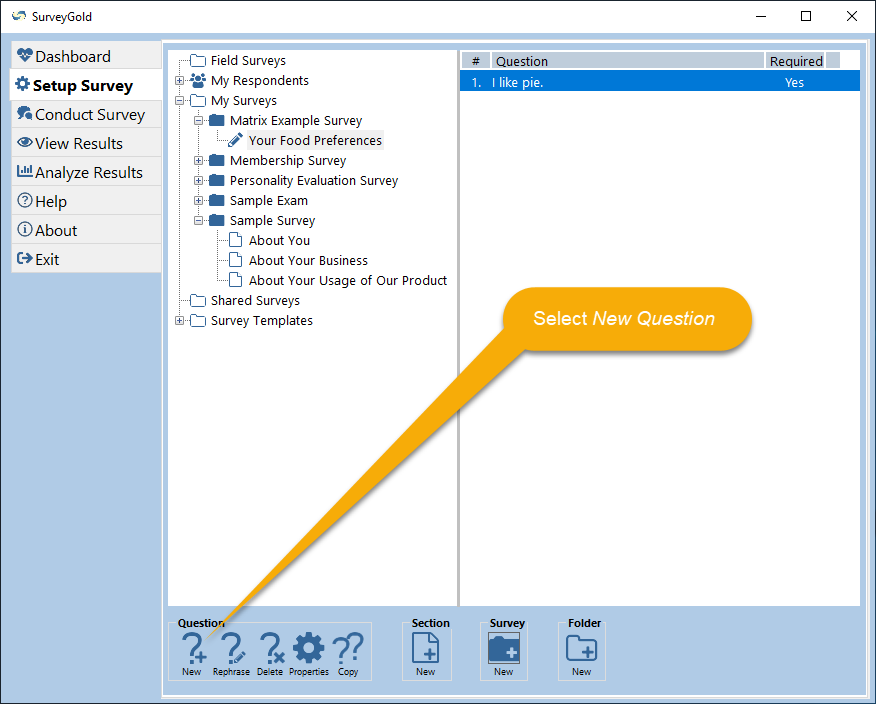
Step 6 - From the Setup Survey tab, select New Question from the button bar.
|
|
Step 7 - When the Enter Your New Question window appears, enter your question text. Make sure that the option "Repeat: Use response choices from your most recently saved question" is selected and select OK.
|
|
Step 8 - When the Question Properties Sheet appears, notice that the response choices are already entered. (This is because the option was selected in the previous window. Select OK to create your question.
|
|
Repeat Steps 6-8 - For every question in the section, repeat the previous three steps. This will ensure that all of the questions in the section have identical response choices.
|
|
Save Survey As Online Survey - When you save your survey as an online survey, you will see that the section is created in a matrix presentation style. The example here demonstrates a SurveyGold online survey question matrix.
|
Pre-populating Fields in a Online Survey Form
Sometimes it is helpful to pre-populate an online survey response with a pre-specified value. For example, if your organization provides customer services and you want to follow up after completing a customer service incident, it would be helpful to send an online survey invitation to the customer where the service incident number (sometimes referred to as a ticket number) is already entered into the appropriate field when for the customer opens the online survey form.
The capability is provided through an advanced feature that uses a Web convention called a query string. A query string is the part of a web address that contains data to be passed to the online survey form. After you have saved your online survey form and placed it on your web site, you append one or more query string names and associated values to the web address of your online survey form when sending that online survey form to a particular respondent. In practice, the web address and the specific query string values are generated by an application such as a customer support or help desk management system that tracks your support incidents.
Here is a list of the query string names for the respondent data fields:
|
Respondent Data Field
|
Query String Name
|
|
First Name
|
RF
|
|
Last Name
|
RL
|
|
Title
|
RT
|
|
Company
|
RC
|
|
Address
|
RA
|
|
City
|
RY
|
|
State
|
RS
|
|
Postal Code
|
RP
|
|
Phone
|
RH
|
|
Fax
|
RX
|
|
Email
|
RE
|
|
Custom 1
|
R1
|
|
Custom 2
|
R2
|
|
Custom 3
|
R3
|
|
Custom 4
|
R4
|
In addition to respondent data fields, any fill-in-the-blank question that allows only one response (as specified in number of responses allowed the Response Choices tab in the Question Properties Sheet) can also have its value assigned via a query string variable. The name of the query string variable is available for copy/paste via the Online Survey Settings tab of the Question Properties Sheet.
Here is an example that explains how this feature is used. Assume that you have a customer support tracking application that creates a ticket number for each support incident for a given customer. Assume also that that you have created a support quality of service online survey form using SurveyGold that uses the custom field to capture the customer support ticket number generated by your customer support tracking application. You have placed the online survey form on your web site and you want to use your customer support tracking application to generate an email to send to the customer at the conclusion of the support incident. You want the email to contain a web address link to the online survey form, and you want the link to pass the customer support incident number into the online survey form so that it is automatically entered in the first author-defined field. This is how you would accomplish this using SurveyGold:
Here is an example that explains how this feature is used. Assume that you have a customer support tracking application that creates a ticket number for each support incident for a given customer. Assume also that that you have created a support quality of service online survey form using SurveyGold that uses the custom field to capture the customer support ticket number generated by your customer support tracking application. You have placed the online survey form on your web site and you want to use your customer support tracking application to generate an email to send to the customer at the conclusion of the support incident. You want the email to contain a web address link to the online survey form, and you want the link to pass the customer support incident number into the online survey form so that it is automatically entered in the first author-defined field. This is how you would accomplish this using SurveyGold:
|
Step 1 - Use SurveyGold to setup your customer satisfaction questions. Open the Survey Properties Sheet in the Setup Survey tab.
|
|
Step 2 - Select the Collect This Respondent Data tab in the Survey Properties Sheet.
|
|
Step 3 - Select the check-box next to the "Custom 1" field and enter the word "Ticket Number" in the prompt just to the right of the "Custom 1" field.
|
|
Step 4 - Select OK to save your changes to the survey and to close the Survey Properties Sheet.
|
|
Step 5 - Save your survey as an online survey form and save it to your website.
Note: You could also save it to our SurveyGold website. It works the same regardless. |
|
Step 6 - Have your customer support tracking application create an email that contains a web address to the online survey form on your site and have it append the support ticket query string and the support ticket value to the web address.
For example, if your online survey form is located at http://www.mysite.com/supportsurvey.htm and the support ticket number for this support incident is 12345-6, then the web address generated by your customer support tracking application would be http://www.mysite.com/supportsurvey.htm?R1=12345-6 |
|
Step 7 - When a respondent selects the link in the email, the online survey form opens and the value 12345-6 appears in the Ticket Number field. Furthermore, the value 12345-6 in the Ticket Number field cannot be altered by the respondent in the online survey form. When the respondent submits their completed form, the value 12345-6 in the Ticket Number field is included in the submitted set of responses.
|
Note: To append multiple query string values, separate them using the ampersand symbol. For example, to pre-populate the responses for the Ticket Number, Customer First Name, Customer Last Name and the response to the first question which contains the service technician's name, your web address would look like this:
http://www.mysite.com/supportsurvey.htm?R1=12345-6&RF=John&RL=Smith&Q1_1=John Doe
The syntax of Q1_1 means "Question 1, Response Value 1".
A SurveyGold blog post describes this topic of pre-populating online survey form fields, as well.
http://www.mysite.com/supportsurvey.htm?R1=12345-6&RF=John&RL=Smith&Q1_1=John Doe
The syntax of Q1_1 means "Question 1, Response Value 1".
A SurveyGold blog post describes this topic of pre-populating online survey form fields, as well.
Saving Your Survey as an Online Survey Form
When you want to create a questionnaire form for use in a web browser, save your survey as an online survey form. In the following example, you will see how easy it is to save your survey as an online survey form. The process is identical for saving your survey as a text file or Word™ document. The only difference is that upon creation of your online survey, you typically copy the online survey file to an Internet web site for respondents to access and complete your survey.
Note: SurveyGold makes it easy for any survey to be saved as an online survey form. It uses hypertext markup language (HTML) to create the online survey. Hence, the file name is created with a .HTM extension for the last three letters. The resulting file contains a your questions and response set in what is commonly referred to as an HTML form. The bottom of the HTML form contains a Submit Your Responses button.
When the Submit Your Responses button is selected by an online survey respondent, their web responses are processed by the surveygold.com website. Responses are recorded on the website so that they can be downloaded into the SurveyGold application at any time.
|
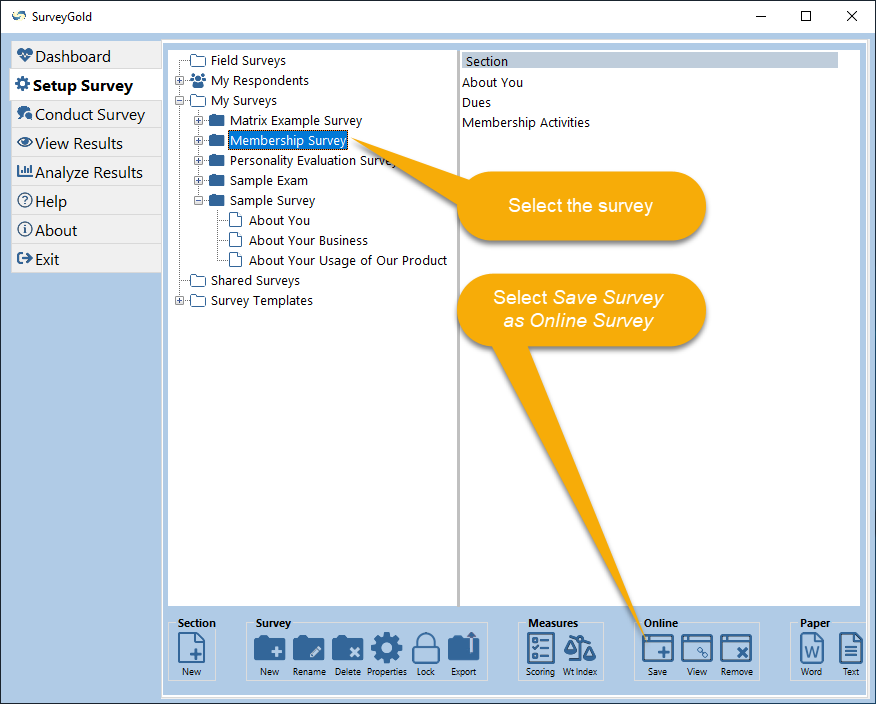
Step 1 - From the Setup Survey tab folder, select your survey in the view on the left side. Select Save Survey as Online Survey in the button bar.
|
|
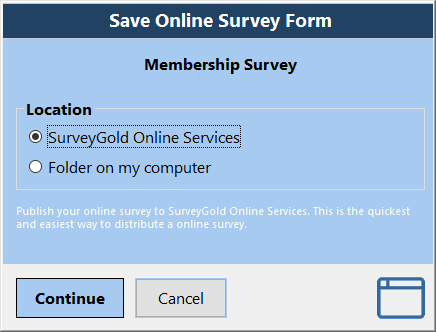
Step 2 - When the Save Online Survey Form window appears, select the location where you want to save your online survey form. Your options are:
If you selected the "Folder on my computer" option, when the Save Survey as Online Survey window appears, verify that the file name is to your liking. Then select Save. Note: SurveyGold automatically names the file using the survey name (removing spaces from the name to make it work better on a web site). However, you may rename the file to any name of your choosing prior to selecting Save. |
|
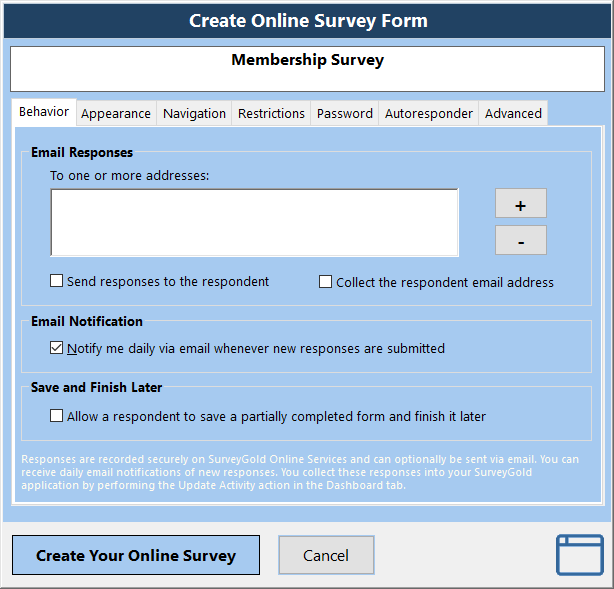
Step 3 - The Create Online Survey Form window appears, which lets you specify the various online survey preferences. In many cases, you will not need to change them.
Here is a description of the preference tabs and their features: |
|
Specifying Behavior Preferences
The following behavior preferences are available.
|
|
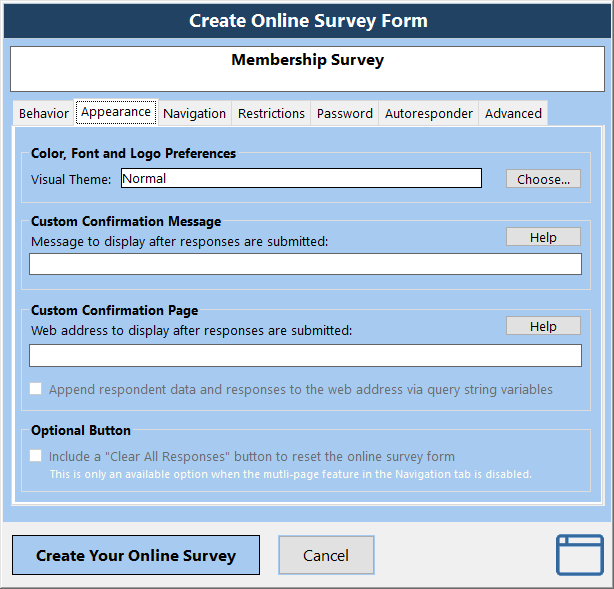
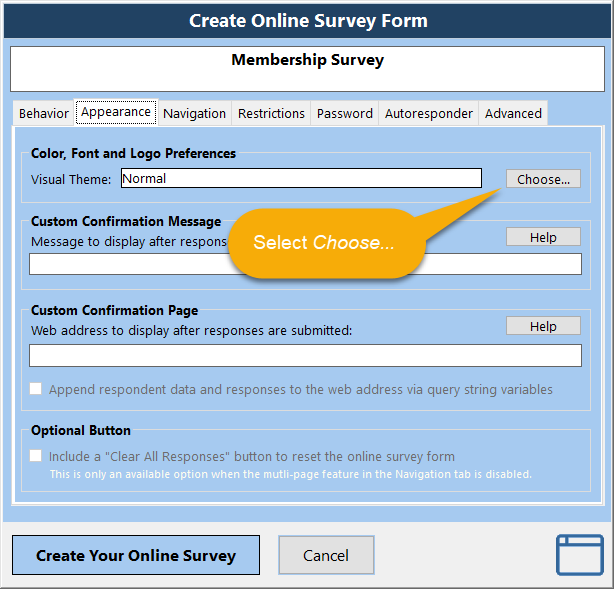
Specifying Appearance Preferences
The following appearance preferences are available. For detailed instructions, see the Specifying Appearance Preferences Step-By-Step topic.
|
|
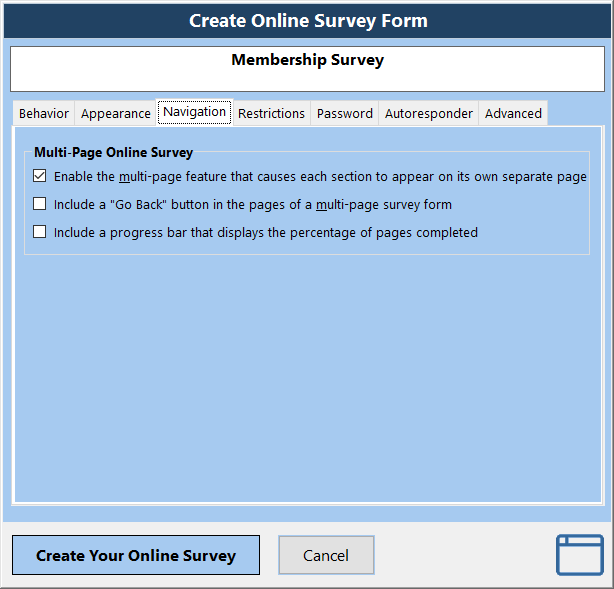
Specifying Navigation Preferences
The following navigation preferences are available. For detailed instructions, see the Specifying Navigation Preferences Step-By-Step topic.
|
|
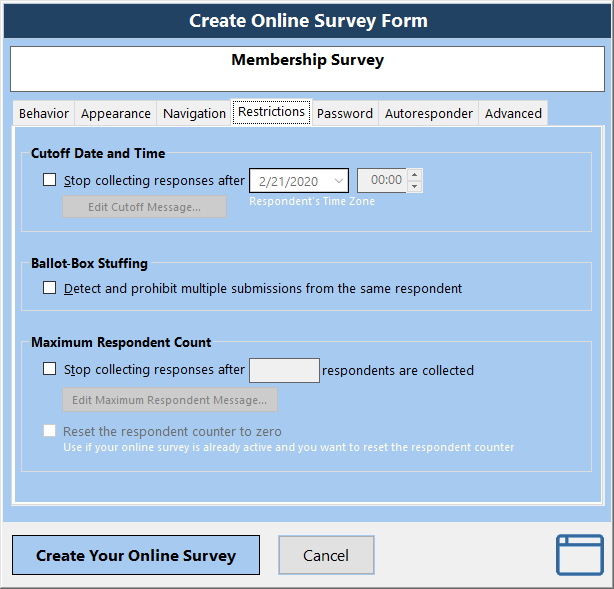
Specifying Restrictions Preferences
For detailed instructions, see the Specifying Restrictions Preferences Step-By-Step topic.
|

|
Specifying Password Preferences
|

|
Specifying Autoresponder Preferences
|

|
Specifying Advanced Preferences
|
|
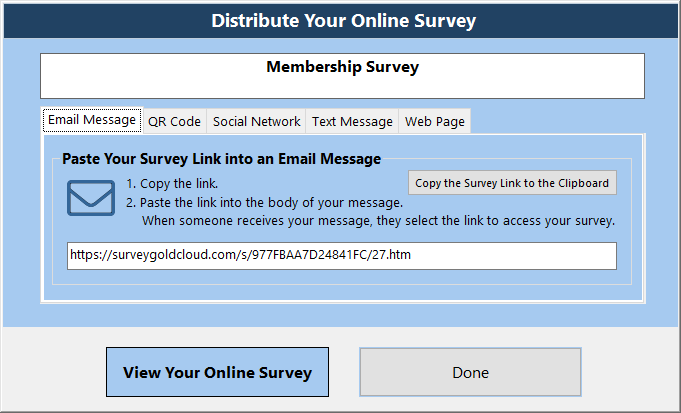
Step 4 - After you have specified your online survey preferences, select Create Your Online Survey Form.
SurveyGold then creates your online survey file and opens a window that provides links for distributing your online survey form via:
To view your online survey form, select View Your Online Survey. Your web browser opens and displays your newly created online survey. Test your survey by completing the form and selecting the "Submit Your Responses" button. Select Done to return control to the Setup Survey tab. |
Specifying Appearance Preferences Step-By-Step
You can set preferences that affect the appearance of your online survey form. Referred to as a Visual Theme, these preferences include color, font and logo preferences, custom messages and the ability to include a "Clear All Responses" button.
You can set preferences that affect the appearance of your online survey form. Referred to as a Visual Theme, these preferences include color, font and logo preferences, custom messages and the ability to include a "Clear All Responses" button.
Specifying Online Survey Font, Color and Logo Preferences Step-By-Step
SurveyGold automatically creates a professionally-formatted online survey form based on Visual Theme preference you specify in the Appearance tab when saving your survey as an online survey form. A visual theme is a set set of font, color and logo preferences that you define and name. Once you define and name a theme, you may use this defined set of preferences when saving any online survey forms in the future.
SurveyGold automatically creates a professionally-formatted online survey form based on Visual Theme preference you specify in the Appearance tab when saving your survey as an online survey form. A visual theme is a set set of font, color and logo preferences that you define and name. Once you define and name a theme, you may use this defined set of preferences when saving any online survey forms in the future.
|
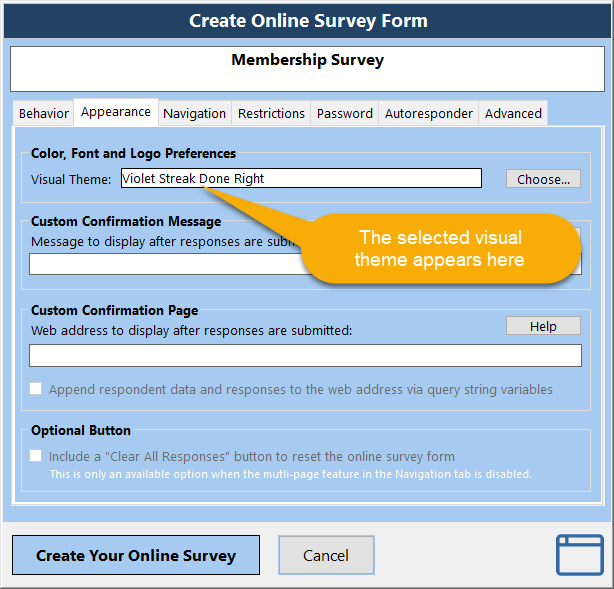
Step 1 - While the Create Online Survey Form window is open, select the Appearance tab.
Select the "Choose..." button and the Online Survey - Visual Theme window opens. |
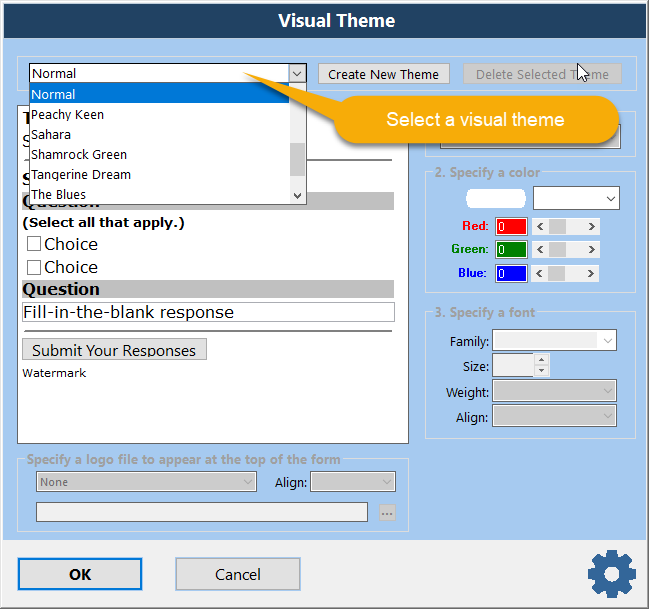
|
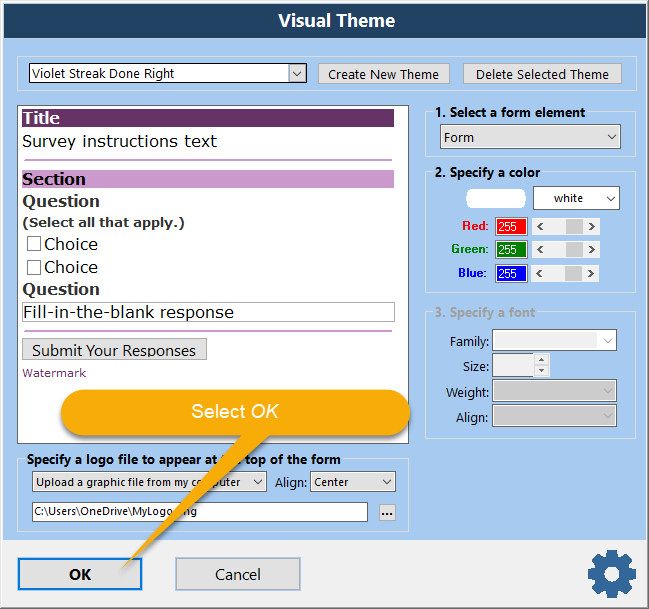
Step 2 - When the Online Survey - Visual Theme window appears, select a visual theme from the list. The selected theme appears as a miniature preview of the online survey form just below the selected theme name.
|
|
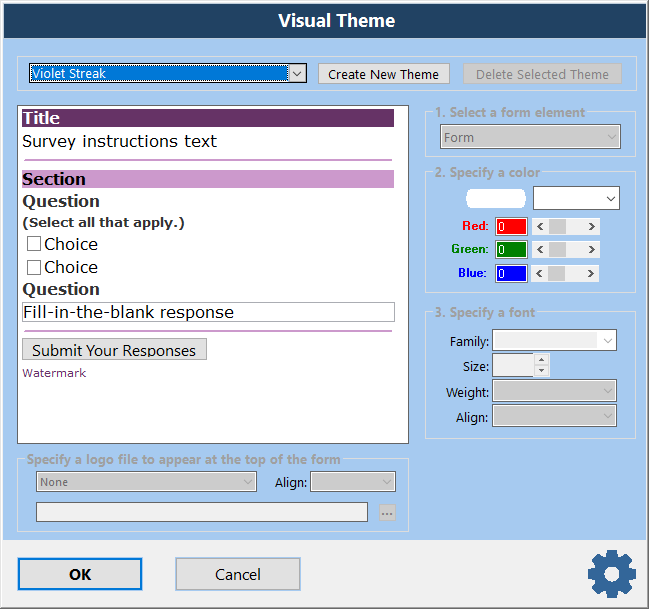
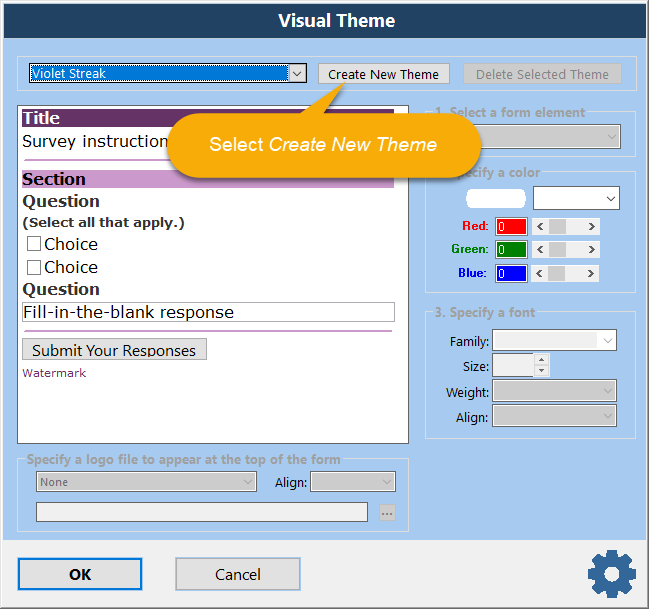
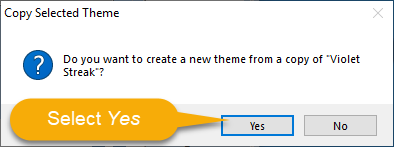
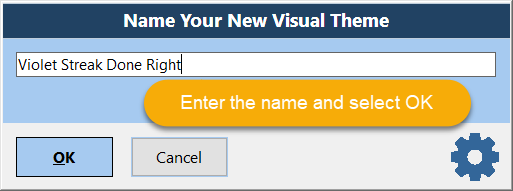
Step 3 - Several predefined visual themes are available. These predefined themes do not have any logo associated with them. You can create your own custom visual theme comprised of your own color, font and logo preferences based on any currently selected theme as follows.
Your newly created theme appears as a miniature preview of the online survey form just below the selected theme name. Specify an online survey form element by selecting it from the list or by selecting it in the preview pane on the right. Then change the color and font preference in the "Specify color" and "Specify font" group boxes in the window. This example shows the form background color selected and the color set to aqua. |

|
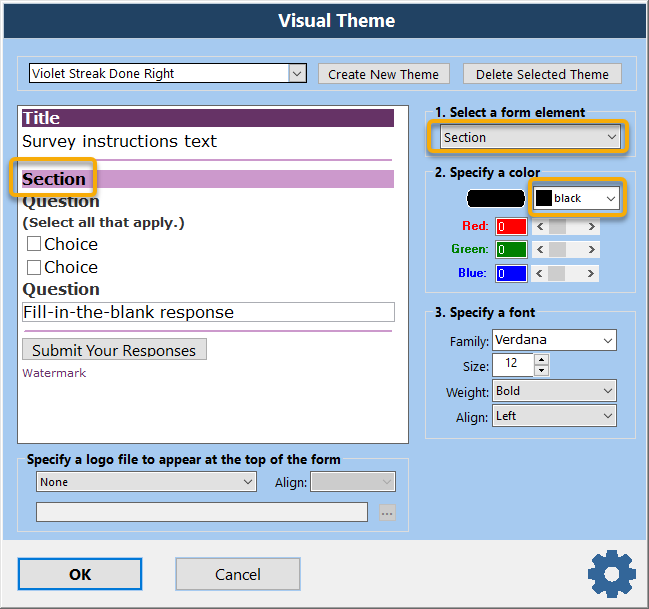
Step 4 - To specify color and font preferences for form elements, select them one at a time by selecting them from the list or by selecting them in the preview pane. Then change the color and font preferences accordingly in the "Specify color" and "Specify font" group boxes. This example shows the section font set to a 12-point "Vernada" with a white color.
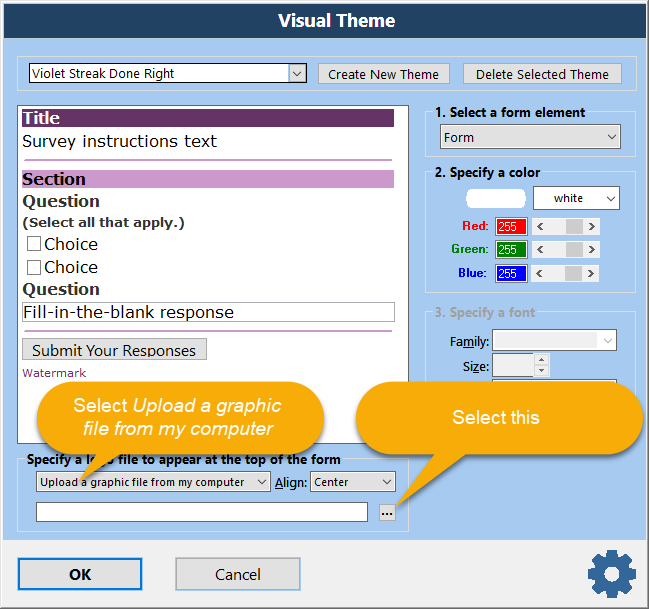
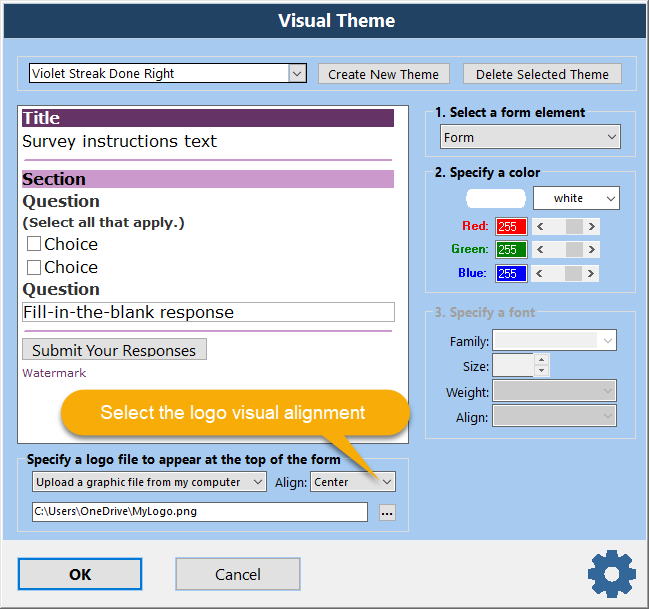
Note: Several standard colors are provided for quick selection in the "Specify color" group box. In addition, you may specify your own custom colors by manipulating the Red, Blue and Green sliders. Note: Not all form elements have a font characteristic. In those cases, when a form element without a font characteristic is selected, the "Specify font" group box is disabled. For example, the form background element does not have a font characteristic. It only has a color characteristic. Note: It is important to use care when selecting a font. Fonts are not embedded in the online survey form. In other words, any font that you specify must be installed on your respondent's computer. Therefore, just because a font is available and displays faithfully on your computer does not mean that is available on your respondent's computer. If the font you specify is not available on the respondent's computer, then their web browser will display another "default" font automatically. You can specify a logo to appear at the top of your online survey form as follows:
|
|
Step 5 - When the font and color preferences are to your liking, select OK in the Online Survey - Visual Theme window. Your selected visual theme name appears in the Appearance tab.
|
- Specifying a Custom Response Confirmation Message Step-By-Step
When a respondent selects the "Submit Your Responses" button in an online survey form, surveygold.com automatically process the responses and displays a standard confirmation message thanking the respondent for submitting responses.
SurveyGold provides the ability to replace the standard confirmation message with your own custom message.
|
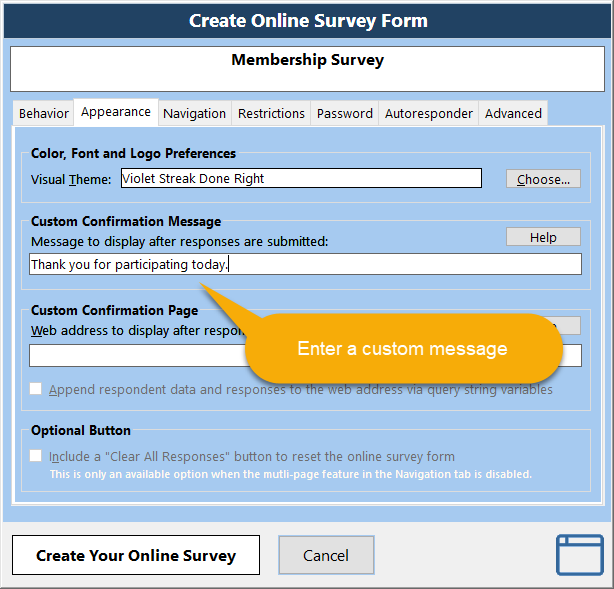
Step 1 - When saving your online survey file in the Setup Survey tab, specify your custom message via the Appearance tab in the Create Online Survey Form window.
Enter the message in the "Message to display after responses are submitted:" field. SurveyGold displays the custom message when the respondent submits their online survey form. |
Specifying a Custom Response Confirmation Page or Custom Web Response Processing Program Step-By-Step
When a respondent selects the "Submit Your Responses" button in an online survey form, surveygold.com automatically process the responses and displays a standard confirmation message thanking the respondent for submitting responses.
SurveyGold provides the ability to do one of the following:
Assuming that you already have a web page created (using your own means) that contains your confirmation message or a custom web program, you can do this with the assistance of an application developer.
The following explanation is a technical and is intended to provide guidance for a survey author working in concert with an application developer or web content developer.
When a respondent selects the "Submit Your Responses" button in an online survey form, surveygold.com automatically process the responses and displays a standard confirmation message thanking the respondent for submitting responses.
SurveyGold provides the ability to do one of the following:
- Redirect the respondent to your web site or any specified web page after submitting responses
- Invoke your own custom web program to perform custom processing logic on the responses and respondent data submitted
Assuming that you already have a web page created (using your own means) that contains your confirmation message or a custom web program, you can do this with the assistance of an application developer.
The following explanation is a technical and is intended to provide guidance for a survey author working in concert with an application developer or web content developer.
|
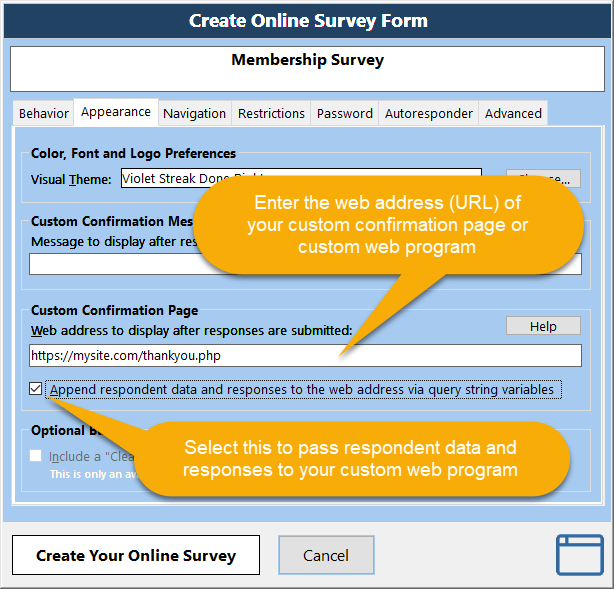
Step 1 - When saving your online survey file in the Setup Survey tab, specify the location (URL) of your web file via the Appearance tab in the Create Online Survey Form window.
Enter the location in the "Web address to display after responses are submitted:" field. SurveyGold optionally appends respondent data and responses to the URL as query string variables. This powerful feature extends the standard online survey response processing (which is always employed regardless) by providing the ability to pass data and responses to your own custom web program. This feature is enabled by selecting the following option in the : "Append respondent data and responses to the web address via query string variables" Specifically, this feature is intended to be used by a survey author who has access to web-based programmers who can produce a custom confirmation page intended to process the responses and respondent data submitted via the online survey form. The custom confirmation page can be written in any web-based programming language (i.e., PHP, VB.NET, C#, Java, VBScript, etc.) that can access data passed into the program via query string variables. This provides the ability to process the responses and respondent data in any way that is appropriate (i.e., recording responses in the author's own database, providing a custom confirmation message, sending email or text notifications, etc.) SurveyGold automatically generates the query string variables based on the response and respondent data submitted via the online survey form as follows: Question response text for a specific question is represented as a value that follows a single-digit integer query string variable name. So, for example, question #1 with a response of "Strongly agree" would appear in the URL as: 1=Strongly%20agree An application developer would write a program looking for a query string value of 1. Respondent data text for specific respondent data field is represented as a value that follows a two-letter query string variable name. The first letter of the variable is always R. The second letter represents the specific respondent data (.e., F for first name, L for last name, A for address, etc.) Here is a list of the query string names for the respondent data fields: Respondent Data Field: Query String Name First Name: RF Last Name: RL Title: RT Company: RC Address: RA City: RY State: RS Postal Code: RP Phone: RH Fax: RX Email: RE Custom 1: R1 Custom 2: R2 Custom 3: R3 Custom 4: R4 So, for example, Respondent First Name with a value of "Elvis" would appear in the URL as: RF=Elvis An application developer would write a program looking for a query string value of RF. |
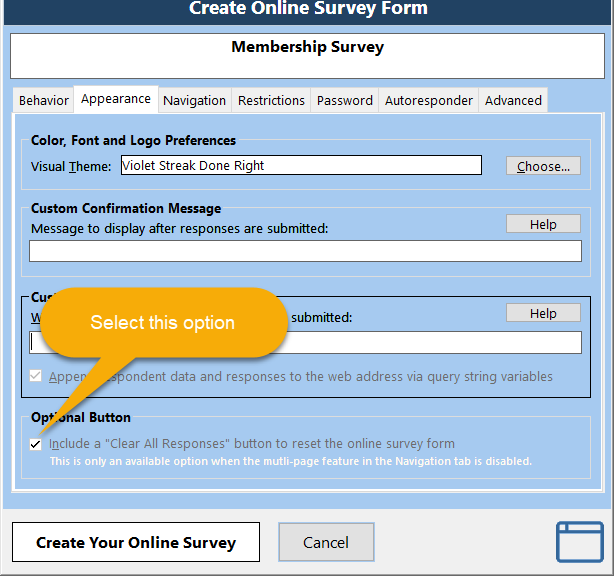
Including a "Clear All Responses" Button to Reset the Form Step-By-Step
Sometimes you may want to use the online survey form as a data entry tool. In this way, you can distribute the online survey form to multiple data entry personnel for them to enter online survey responses collected via phone or paper form.
In this context, it helps to have a button to clear all of the online survey responses. A online survey respondent who is doing repetitive data entry from paper-based survey forms could use this button after selecting the "Submit Your Responses" button. After seeing the confirmation message displayed in their web browser, the online survey respondent would select their browser's Back button and the online survey form would reappear with all of the just-submitted responses contained in it. The online survey respondent would then select the "Clear All Responses" button to clear all of the responses from the form in order to allow for a new set of responses to be entered.
Here is how to do this:
|
Step 1 - When saving your online survey file in the Setup Survey tab, select the option "Include a "Clear All Responses" button to reset the online survey form" via the Appearance tab in the Create Online Survey Form window.
|
Specifying Navigation Preferences Step-By-Step
Your online survey form has several navigational options including single-page/multi-page display capabilities, the ability to navigate backwards through multiple survey pages, and the ability to display a progress bar when the multi-page display is enabled.
Your online survey form has several navigational options including single-page/multi-page display capabilities, the ability to navigate backwards through multiple survey pages, and the ability to display a progress bar when the multi-page display is enabled.
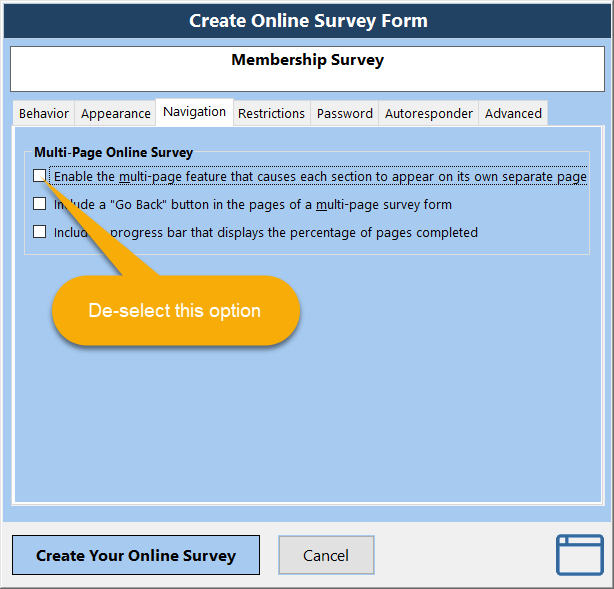
Specifying a Single-Page Form Step-By-Step
Your online survey form can display as a single page with all questions in all sections appearing on one page.
Your online survey form can display as a single page with all questions in all sections appearing on one page.
|
Step 1 - When saving your online survey file in the Setup Survey tab, de-select the option "Enable the multi-page feature where each section appears on its own page" in the Appearance tab in the Create Online Survey Form window.
|
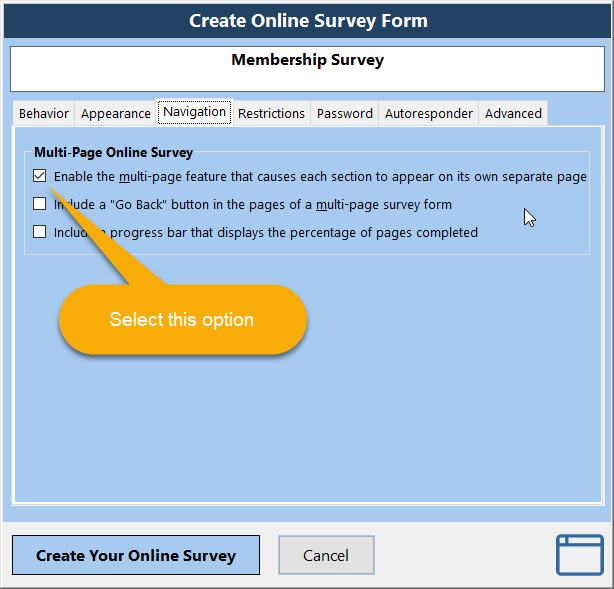
Specifying a Multi-Page Form Step-By-Step
Your online survey form can display as multiple pages with each section appearing on its own page.
Your online survey form can display as multiple pages with each section appearing on its own page.
|
Step 1 - When saving your online survey file in the Setup Survey tab, select the option "Enable the multi-page feature where each section appears on its own page" in the Appearance tab in the Create Online Survey Form window.
|
Including a "Go Back" Button Step-By-Step
When your online survey form displays as multiple pages it can allow for backward navigation by displaying a "Go Back" button.
When your online survey form displays as multiple pages it can allow for backward navigation by displaying a "Go Back" button.

|
Step 1 - When saving your online survey file in the Setup Survey tab, select the option "Include a Go Back button in the pages of a multi-page survey form." in the Appearance tab in the Create Online Survey Form window.
|
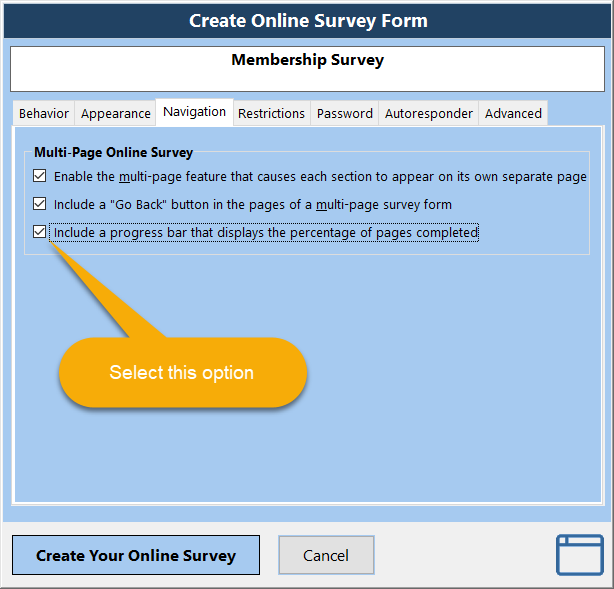
Including a Progress Bar Step-By-Step
When your online survey form displays as multiple pages it can display a progress bar that shows the respondent what percentage of the survey is completed.
When your online survey form displays as multiple pages it can display a progress bar that shows the respondent what percentage of the survey is completed.
|
Step 1 - When saving your online survey file in the Setup Survey tab, select the option "Include a progress bar that displays the percentage of pages completed" in the Appearance tab in the Create Online Survey Form window.
|
Specifying Restrictions Step-By-Step
Your online survey form can employ certain restrictions that you specify. These include the ability to specify a cutoff date and time, to disallow multiple responses from the same respondent and a maximum respondent count.
Note: The restrictions features are only available when an online survey form is saved to the SurveyGold website. The restrictions features are not available when an online survey form is saved to a folder on your computer.
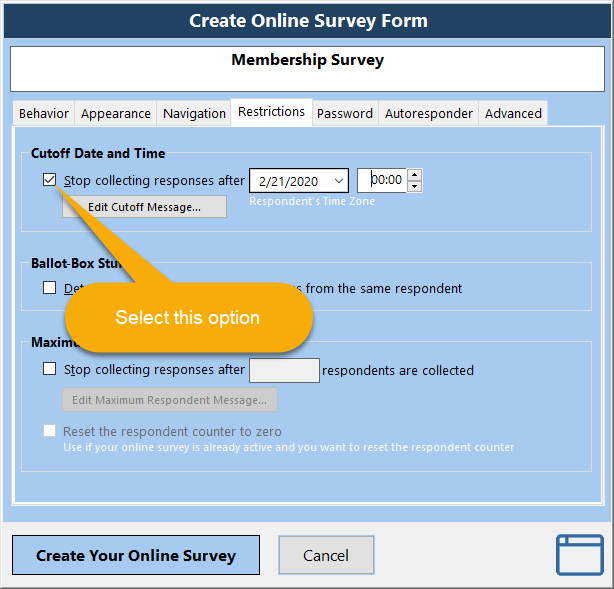
Specifying a Cutoff Date and Time Step-By-Step
Your online survey form can stop collecting responses on a date and time that you specify.
Your online survey form can stop collecting responses on a date and time that you specify.
|
Step 1 - When saving your online survey file in the Setup Survey tab, select the option "Stop collecting responses after" and specify a date and time in the Restrictions tab in the Create Online Survey Form window.
You can specify a message by selecting Edit Cutoff Message in the Restrictions tab in the Create Online Survey Form window. Note: The cutoff date and time feature is only available when an online survey form is saved to the SurveyGold website. The cutoff date and time feature is not available when an online survey form is saved to a folder on your computer. |
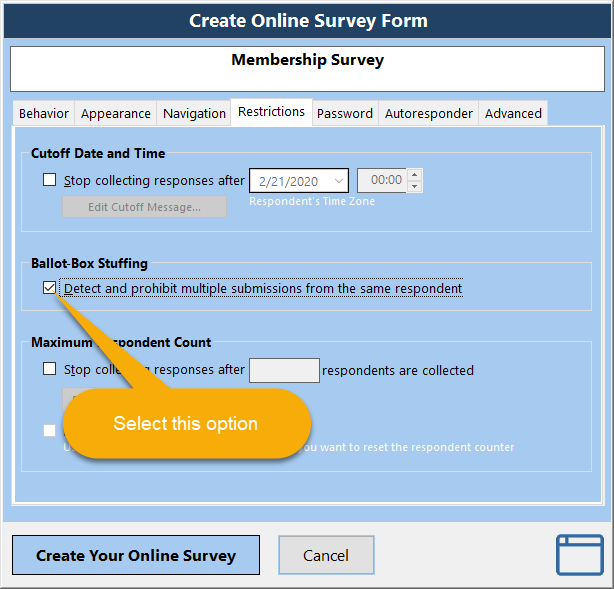
Enabling Ballot-Box Stuffing Detection Step-By-Step
Your online survey form can prohibit multiple submissions from the same respondent.
Your online survey form can prohibit multiple submissions from the same respondent.
|
Step 1 - When saving your online survey file in the Setup Survey tab, select the option "Detect and prohibit multiple submissions from the same respondent" in the Restrictions tab in the Create Online Survey Form window.
Note: The ballot box stuffing detection feature is only available when an online survey form is saved to the SurveyGold website. The ballot box stuffing detection feature is not available when an online survey form is saved to a folder on your computer. |
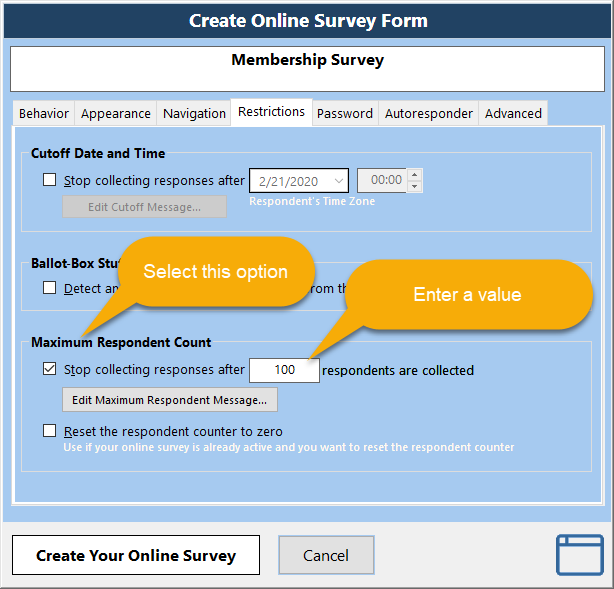
Specifying a Maximum Respondent Count Cutoff Step-By-Step
Your online survey form can stop collecting responses when a specified number of respondents have submitted responses.
Your online survey form can stop collecting responses when a specified number of respondents have submitted responses.
|
Step 1 - When saving your online survey file in the Setup Survey tab, select the option "Stop collecting responses after" and specify the number of respondents in the Restrictions tab in the Create Online Survey Form window.
When a respondent opens the online survey form after responses from the specified number of respondents has been collected, the message is displayed and no survey questions appear. Note: The maximum respondent count feature is only available when an online survey form is saved to the SurveyGold website. The maximum respondent count feature is not available when an online survey form is saved to a folder on your computer. |
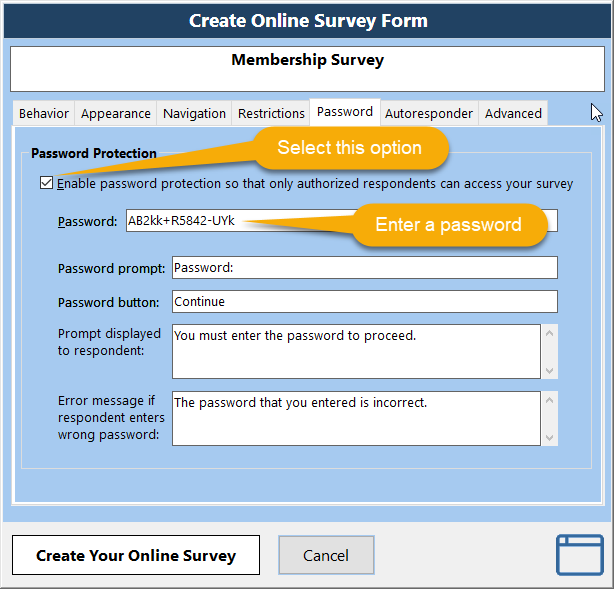
Specifying Password Protection Step-By-Step
Your online survey form can be password protected so that only those respondents who know the password can proceed in completing the online survey form.
Your online survey form can be password protected so that only those respondents who know the password can proceed in completing the online survey form.
|
Step 1 - When saving your online survey file in the Setup Survey tab, select the option "Enable password protection so that only authorized respondents can access your survey" and specify a password in the Password tab in the Create Online Survey Form window.
When a respondent opens the online survey form a password dialog appears and the respondent must correctly enter the password to proceed. The password is case-sensitive which means that the respondent must enter the password using any capitalized letters that specified. Note: The password protection feature is only available when an online survey form is saved to the SurveyGold website. The password protection feature is not available when an online survey form is saved to a folder on your computer. |
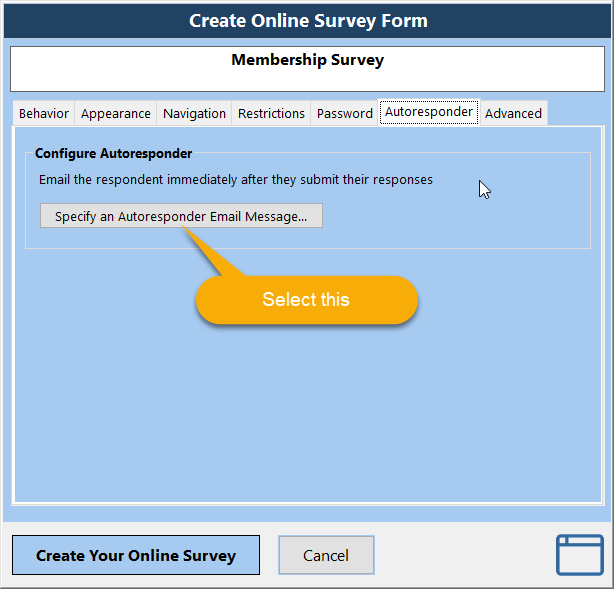
Specifying Autoresponder Preferences Step-By-Step
Your online survey form can be password protected so that only those respondents who know the password can proceed in completing the online survey form.
Your online survey form can be password protected so that only those respondents who know the password can proceed in completing the online survey form.
|
Step 1 - When saving your online survey file in the Setup Survey tab, select Specify an Autoresponder Email Message in the Autoresponder tab in the Create Online Survey Form window.
When a respondent opens the online survey form a password dialog appears and the respondent must correctly enter the password to proceed. The password is case-sensitive which means that the respondent must enter the password using any capitalized letters that specified. Note: The password protection feature is only available when an online survey form is saved to the SurveyGold website. The password protection feature is not available when an online survey form is saved to a folder on your computer. |
|
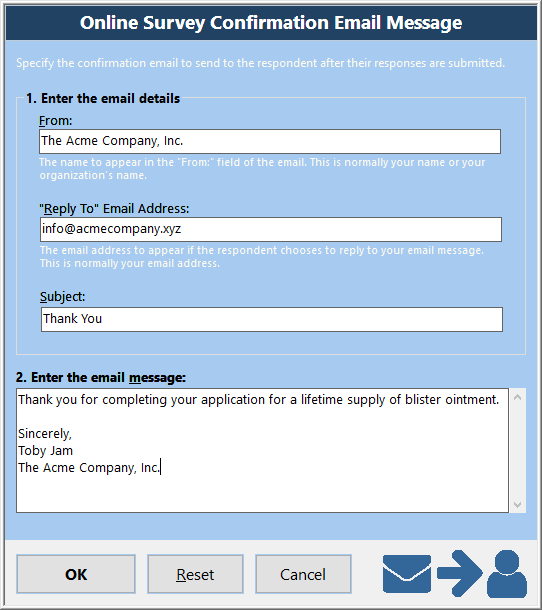
Step 2 - Enter the details for the autoresponder email message and select OK to save your preferences.
|
Specifying Advanced Preferences
The Advanced tab provides the ability to:
The Advanced tab provides the ability to:
- Enable/disable the "Enter" key from submitting responses
- Include a button to enable bookmarking and sharing of your online survey form via social networks
- Enable a spell checker