Section 2. Setting Up Your Survey
The Setup Survey tab folder is where you create surveys and maintain respondents. The process of creating a survey is the same regardless of how you intend to conduct your survey. In fact, you can conduct the exact same survey online, over the phone, in-person or with a printed questionnaire.
Tap or click images to enlarge them.
Tap or click images to enlarge them.
Naming Your Survey
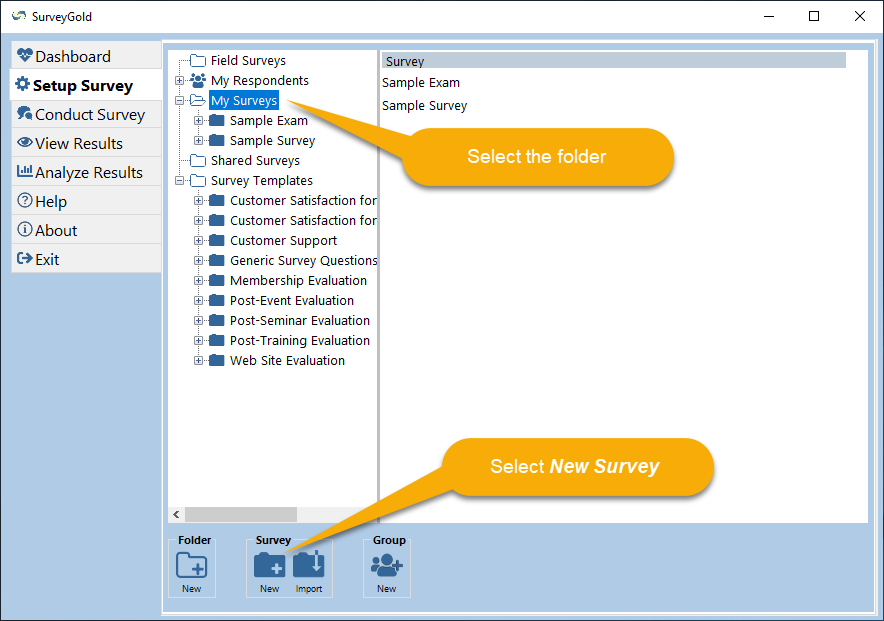
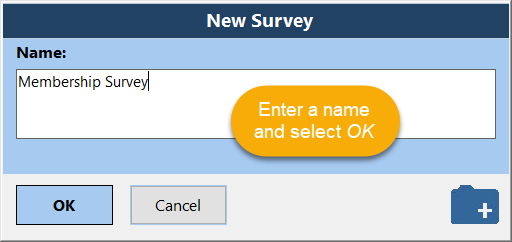
Creating and naming your survey is quick and easy.
Creating and naming your survey is quick and easy.
|
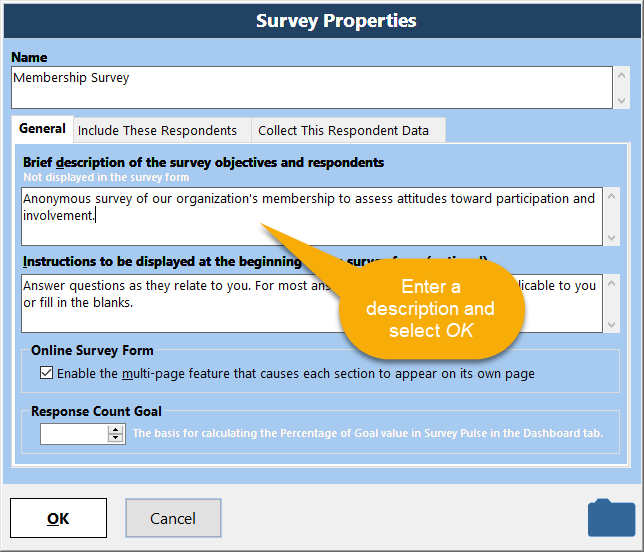
Step 3 - The survey properties sheet for your survey opens next. Here you can enter a description of the survey, specify respondents, specify respondent data to collect and specify instructions to include on the printed survey questionnaire.
Enter a brief survey objective and description of respondents. The example to the left portrays a membership survey of a volunteer organization. Select OK to save changes. This closes the survey properties sheet and prompts you to create a survey section. Note: SurveyGold automatically creates survey instructions for you when you create a new survey. These instructions are printed at the top of the questionnaire. You may change survey instructions at any time after you create a survey via the survey properties sheet. Survey instructions are optional. If you leave the instructions field blank, no instructions will appear at the top of the questionnaire. Note: You can access survey properties and change properties at any time after you create a survey via the survey properties sheet. Note: The description you enter will be displayed in the SurveyGold Results Viewer as well as in the published Word Report. This description is intended to help you distinguish one set of survey results from another. |
|
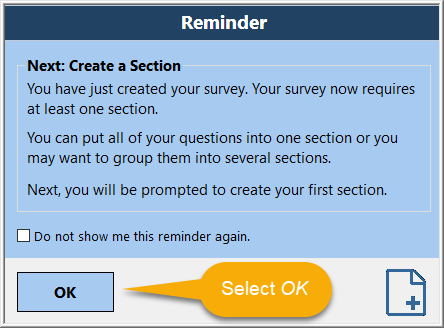
Step 4 - Select OK to create your first survey section. Then continue with Step 3 in Creating Your Survey Sections below.
Note: The discussion on the Include These Respondents and Collect This Respondent Data tabs in the survey properties sheet is intentionally omitted this time. The topic of respondents is discussed in the Setup Respondents section of the user guide. |
Creating Your Survey Sections
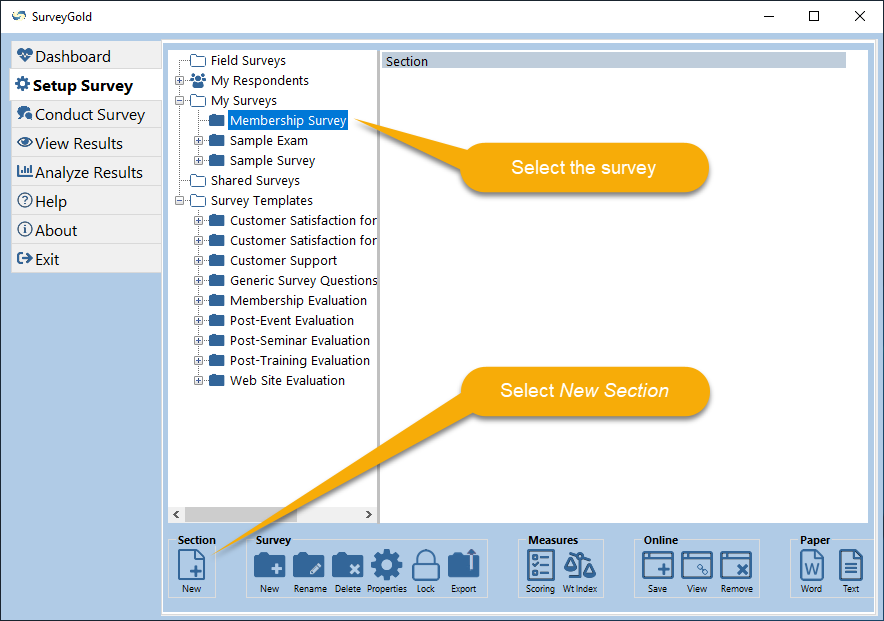
SurveyGold organizes surveys into sets of related questions call sections. A survey is comprised of one or more sections.
As a survey author you may want to include a set of questions that captures the demographic traits of your respondents. To do this you could create a section entitled "About You". This section could then include demographic questions pertinent to your survey such as gender, age, membership in years, etc.
Productivity Note: After creating a section, you can copy the entire section, questions and all, to any other survey you subsequently create by simply dragging and dropping the section onto another survey in the view. This makes it possible to quickly create new surveys by borrowing question from other existing surveys.
Creating a section is similar to creating a survey. Repeat the following steps for each survey section you want to create.
|
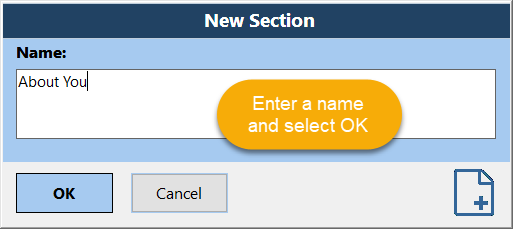
Step 2 - Enter a name for your section and select OK. In addition to appearing here, the name you enter is also used as the section title of the questionnaire. The example herein demonstrates creating a section entitled "About You".
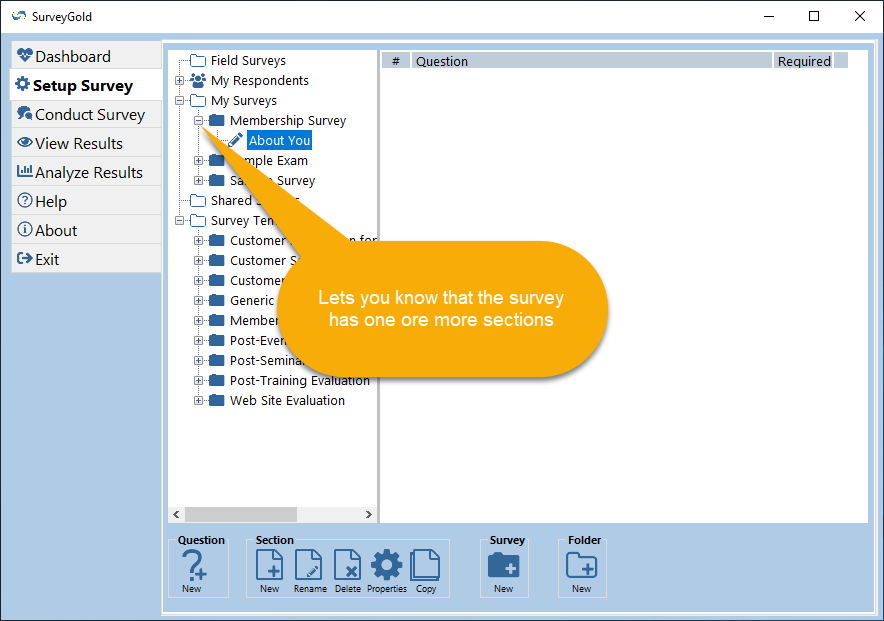
Note: Now that your survey has a section, notice the - next to your survey in the view on the left side. This lets you know that the survey has one or more sections. |
|
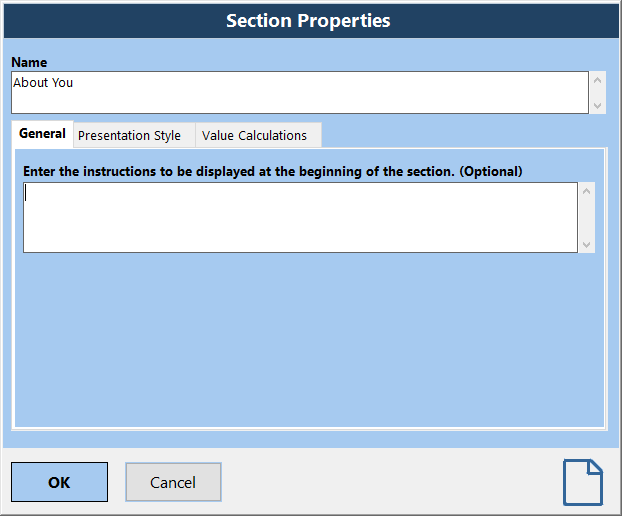
Step 3 (Optional) - Select Edit Section Properties to open the section properties sheet. Here you can specify optional section instructions and save them by selecting OK. Any section instructions you enter will appear in your survey after the section title and before the first question in the section. The discussion of other items in the section properties sheet is deferred until later.
|
Creating Your Survey Questions
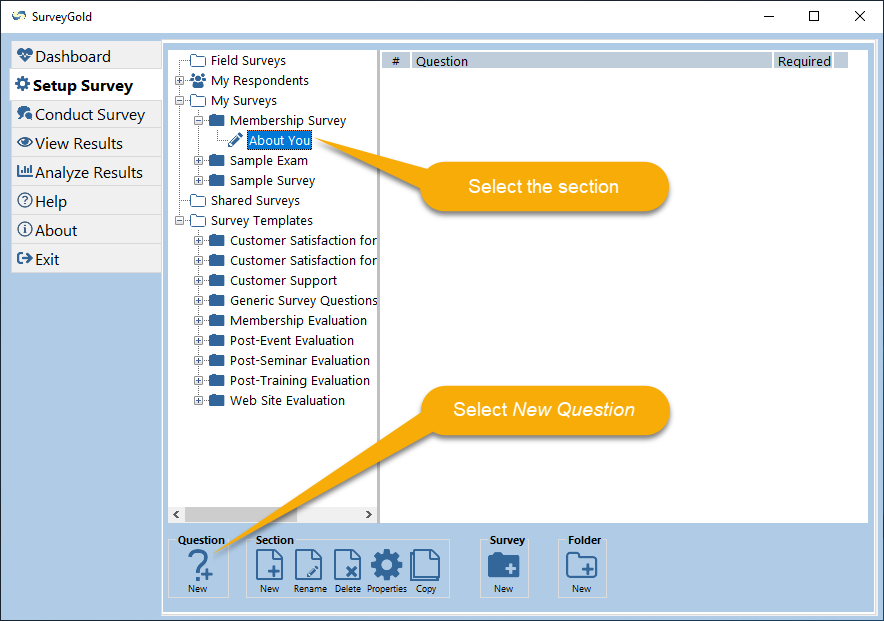
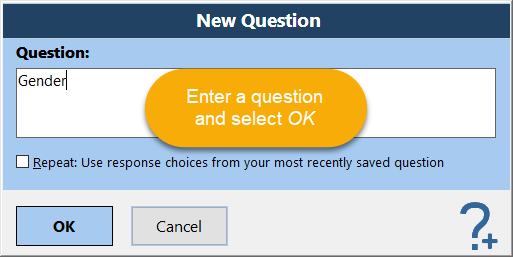
To add a question to your survey, you include it in a section. Creating a question is similar to creating a section. Repeat the following steps for each survey question you want to create.
Note: To clarify a point about how surveys are organized in SurveyGold, a question can only be included in a section. That is why each survey is required to have at least one section. Stated another way, you cannot add questions directly to a survey. You must first create a section within a survey. Then you can add a question to the section.
|
Step 1 - From the Setup Survey tab folder, select your section in the folder view on the left side. This causes all questions contained in your section to appear in the list on the right. If your section contains no questions, then no questions appear on the right. Select New Question in the button bar.
|
|
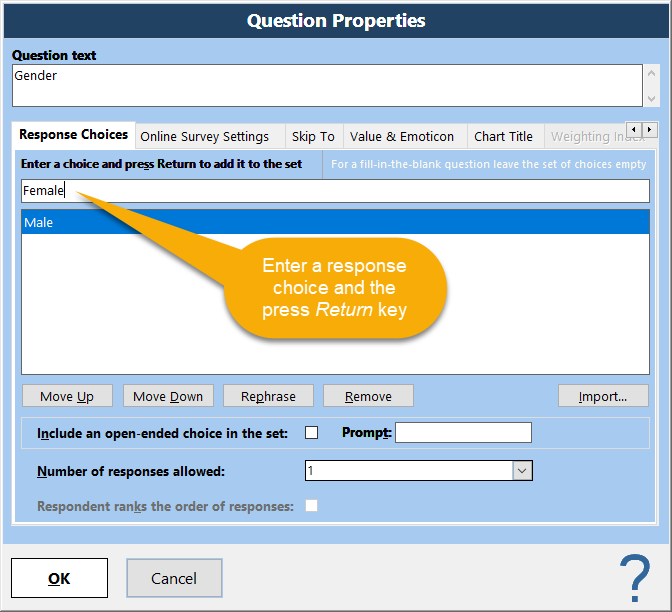
Step 3 - The question properties sheet for your question opens next. Here you can specify:
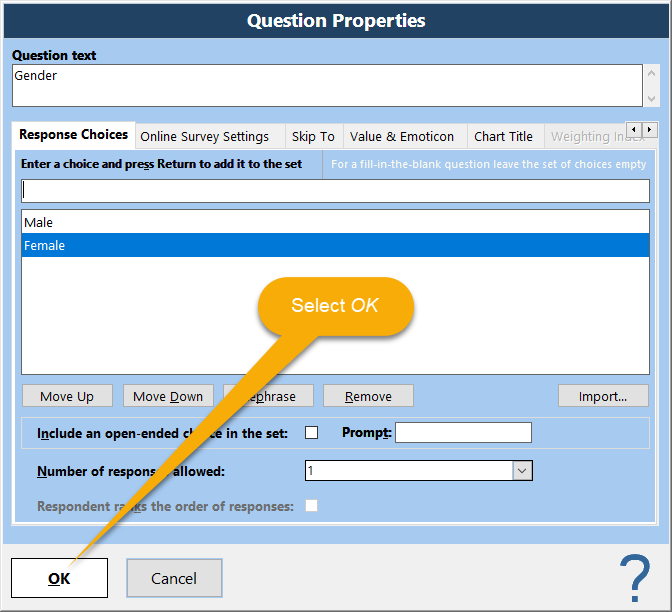
If your question requires a set of response choices for the respondent to select from, enter them one at a time. Simply type a response choice and press the Return key. In the example to the left, the response choice "Male" has just been entered. The response choice "Female" is about to be included in the list of response choices by pressing Return. Note: You can access question properties and change properties at any time after you create a question via the question properties sheet. Note: The number of responses you specify affects the prompt provided for this question in the printed survey questionnaire form. For example, if you enter several choices and specify in the Response Style tab that multiple responses are allowed, this causes the prompt "(Select all that apply.)" to appear just above the choice in the printed survey questionnaire form. |
|
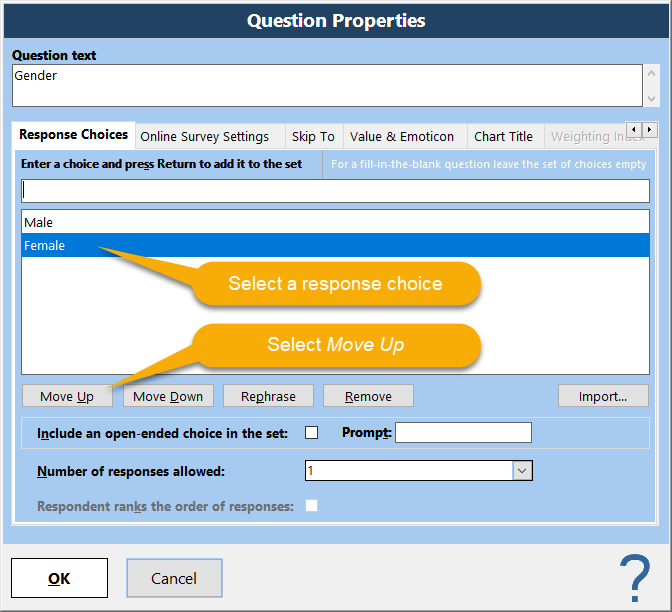
Step 4 - If you want to change the order in which response choices appear, select Move Up or Move Down as appropriate. In the example to the left, the response choice "Female" is re-positioned to appear before "Male".
Note: If you want a small fill-in-the-blank field alongside the last response choice in the set, then select the "Include an open-ended choice in the set" check-box. For example, if you wanted your last response choice to be "Other" followed by a fill-in-the-blank field, then you would check the check-box and enter "Other" in the Prompt field. |
|
Step 5 - Select OK to save changes. This closes the Question Properties Sheet and returns control to the Setup Survey tab folder.
Note: Each new question you create automatically sets number of responses to "Only one response". This means that only one response is allowed for a question unless you change the number of responses to some other value. Note: The discussion on the remaining tabs in the question properties sheet is deferred until later in the Preparing Your Web Survey and Viewing Your Survey Results sections of the user guide. |
Specifying Respondent Data to Collect in Your Survey
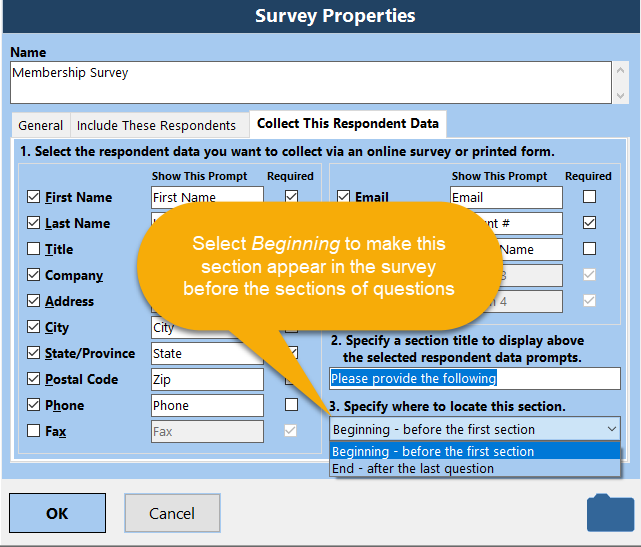
The collection of survey respondent data is optional. If your survey requires the collection of respondent data, SurveyGold creates a special section in your survey that prompts the respondent for any or all of the following data: first and last name, job title, address, city, state/province, postal code, phone, fax, email and any of four user-defined fields. This special section is placed in the survey either before the first section or after the last section.
Note: When conducting your survey as a web survey form, any respondent data collected via this special section is automatically imported into SurveyGold by performing Update Activity action in the Home tab.
|
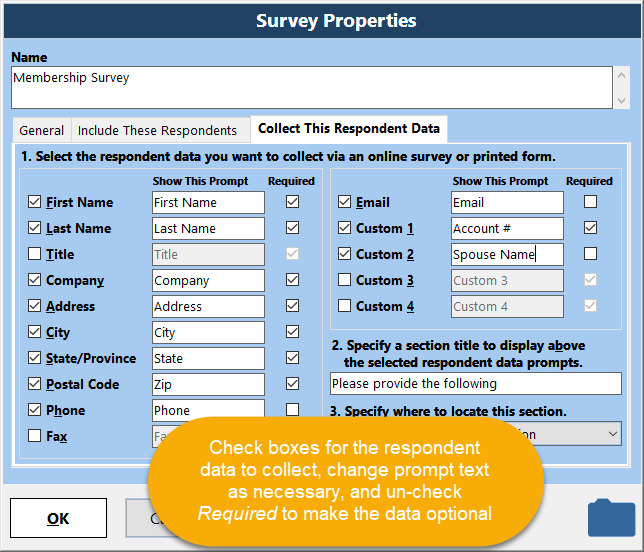
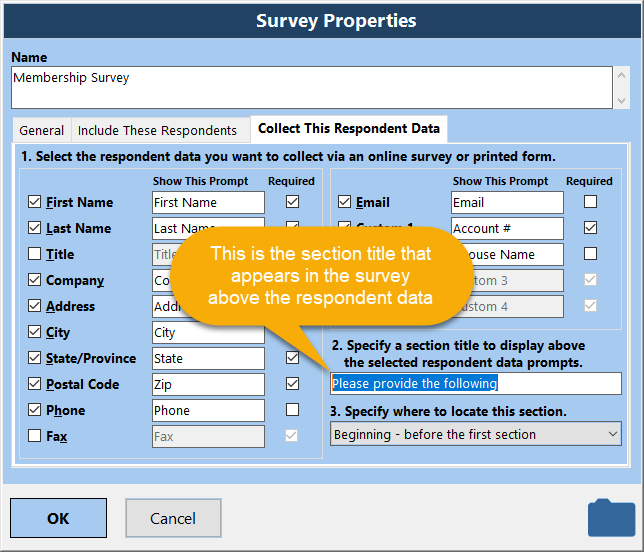
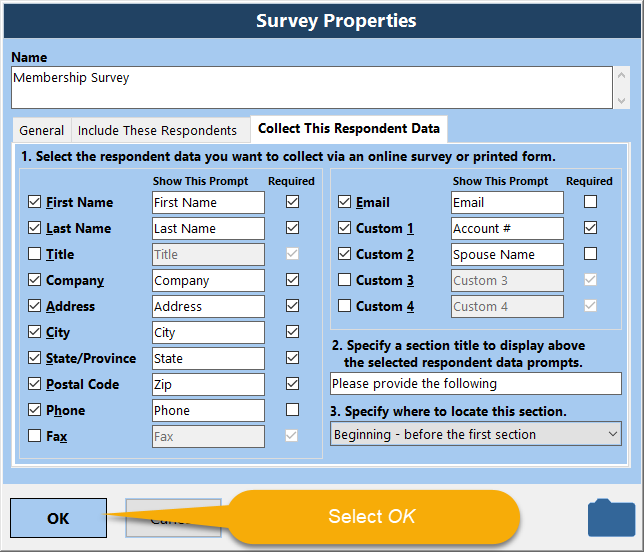
Step 2 - When the survey properties sheet opens, select the Collect This Respondent Data tab. Here you can specify the following:
Select the check-box next to each respondent data field you want to appear in your survey. When a check appears in a check-box, note that the cursor moves to the prompt field associated with that data field. Any modifications you make here in the prompt field will appear in your survey. For example, if you are conducting a survey of USA residents, you may choose to enter the phrase "Zip Code" instead of "Postal Code". Note: Respondent data can be specified as required or optional via the "Required" checkbox to the right of each respondent data field. Specifying a respondent field as required places an asterisk suffix on the prompt and makes it so that a web survey form cannot be submitted without the field being completed by the respondent. |
|
Step 5 - Select OK to save changes. This closes the Survey Properties Sheet and returns control to the Setup Survey tab folder.
Note: This special section does not appear in the Setup Survey treeview or listview items associated with your survey. Rather, it appears in your survey form when you print it or when you save it as a text file, Word file or Web file. |
Setting Up Scoring / Creating an Exam
In addition to creating survey questionnaires, SurveyGold also provides the ability to create examinations or tests. In this context, each question can have an "optimal" response associated with it. This "optimal" response is the correct or preferred response to a question. Also, each question can optionally have a point value associated with it. The total number of points for an entire survey can be established up to a maximum of 1,000 points.
After you specify optimal responses to questions and assign point values, SurveyGold automatically displays the optimal responses in the various actions in the View Results and Analyze Results tabs. In addition, the Analyze Results tab produces a roster or respondents and derives a score for each respondent based upon the responses they provided. This is a huge time savings when compared with manually scoring exams.
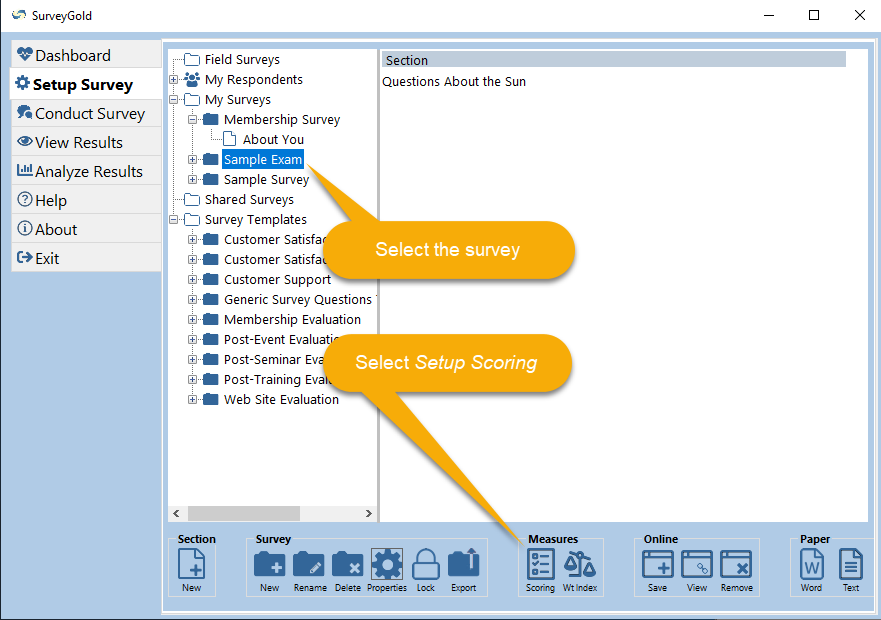
|
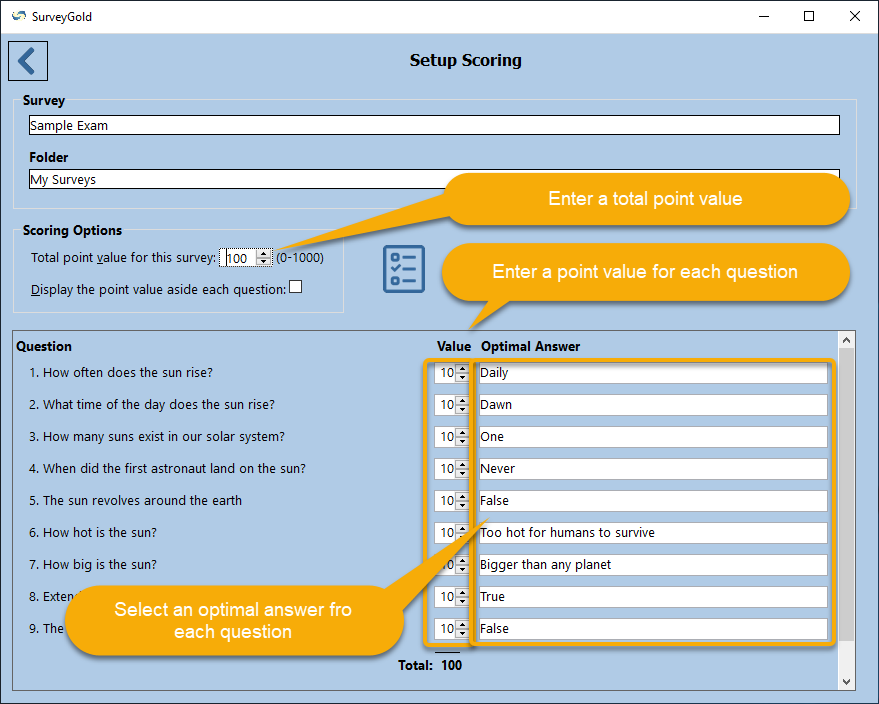
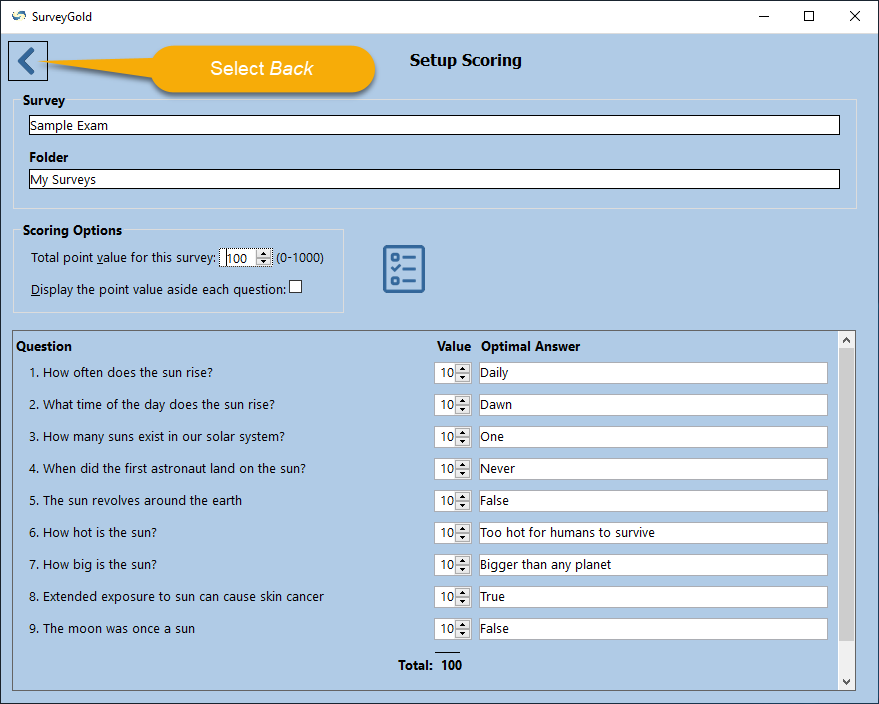
Step 2 - When the Setup Scoring panel displays, enter the total point value (from zero to 1000) for the survey in the first field. For each question, enter an appropriate point value and select the optimal response from the drop-down list of choices.
Note: If you intend to use your survey form as an exam, you should specify a survey total point value greater than zero. Then you should assign appropriate point values and optimal answers to each question. If you desire for the point value of each question to appear on your exam questionnaire, select the second check-box. When setting up scoring, SurveyGold checks to make sure that the sum of the point values of individual questions equals the survey total point value specified. If the two values are out of balance, a warning message appears to that effect. After the exam is conducted, the View Results and Analyze Results tabs use the individual question point values and optimal answers to derive a total score for each respondent's submitted responses. Note: If you do not intend to use your survey form as an exam, but still want to specify a "preferred" or "correct" answer for each question (to compare actual responses against), you should set the survey total point value to zero. Then you should assign a zero point value and optimal answers (as appropriate) to each question.After the survey is conducted, the View Results or Analyze Results tabs display the optimal answers alongside the actual responses given. However, when the survey total point value is set to zero SurveyGold will neither derive nor display a score for each individual respondent's completed questionnaire. |
Setting Up a Weighting Index
SurveyGold optionally provides the ability to define a set of attributes (such as "cost", "dependability", "accuracy", etc.) and associate them with your survey via the survey properties sheet. You can then assign any one of these attributes to a question choice along with an integer score (positive or negative) via the question properties sheet. Theses attributes can be assigned before, during or after the survey responses are collected into SurveyGold.
In this context, the survey is an instrument intended to measure one or more quantitative attributes. Each question response has one or more integer values (positive or negative) associated with a particular attribute. Upon submission of all responses to a survey, these integer values can be aggregated to determine the quantitative value of each attribute.
Examples of this kind of survey application include:
The formula used to derive the weighting index for a given attribute is as follows:
weighting index for attribute = score x attribute weight
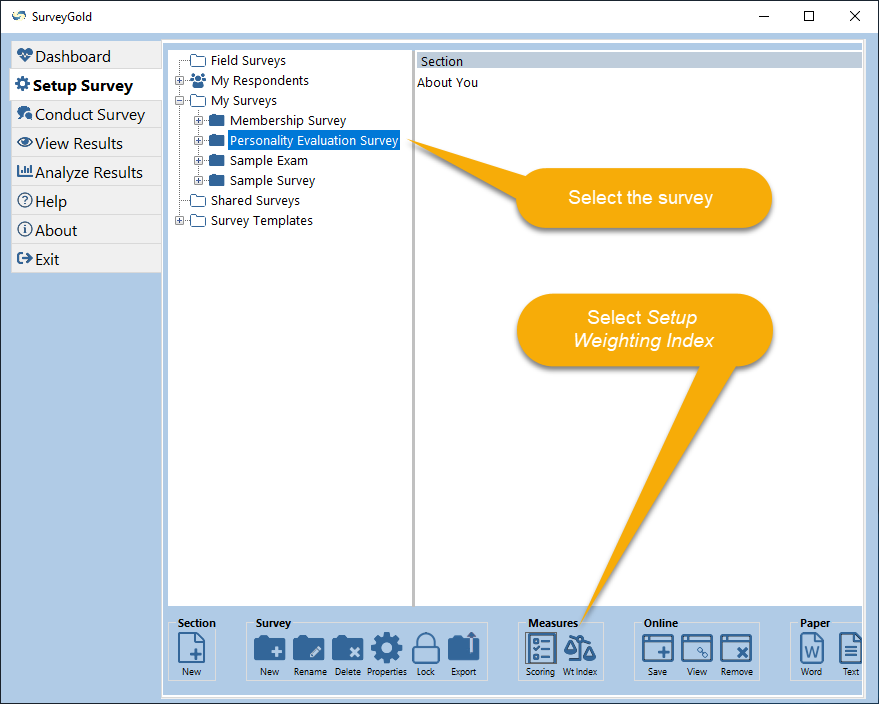
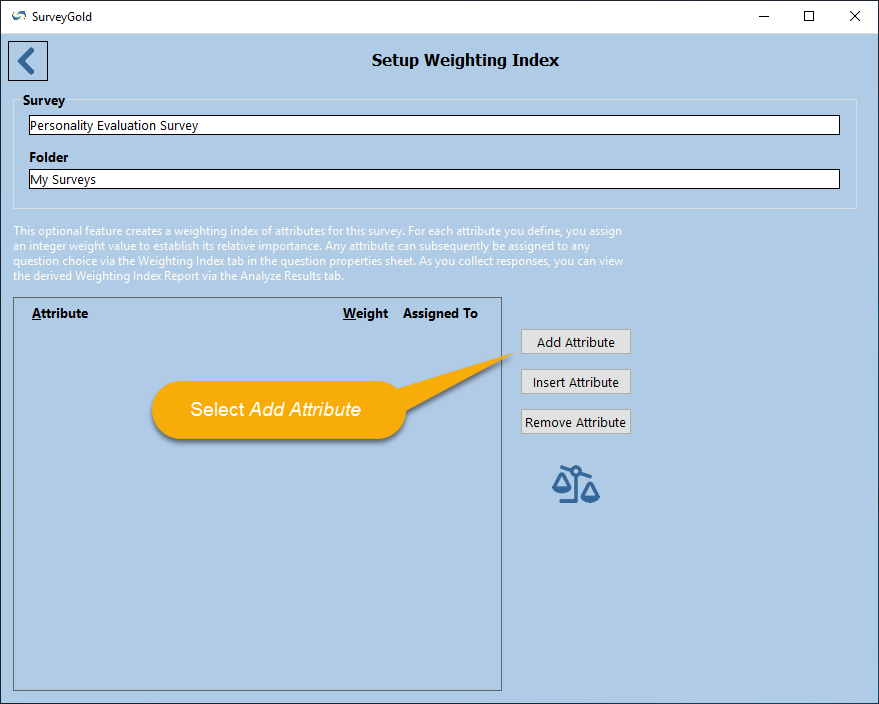
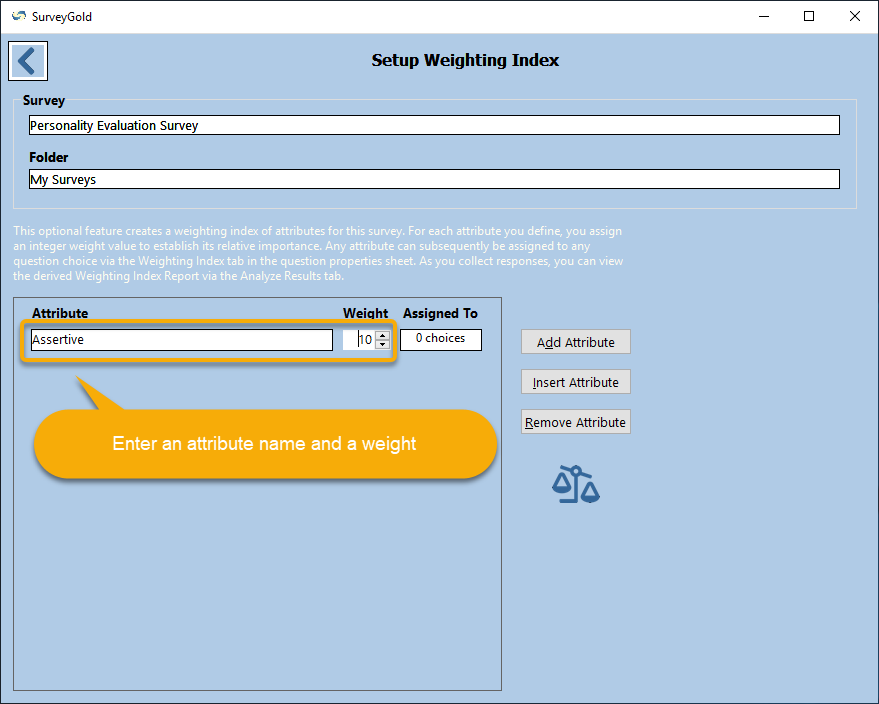
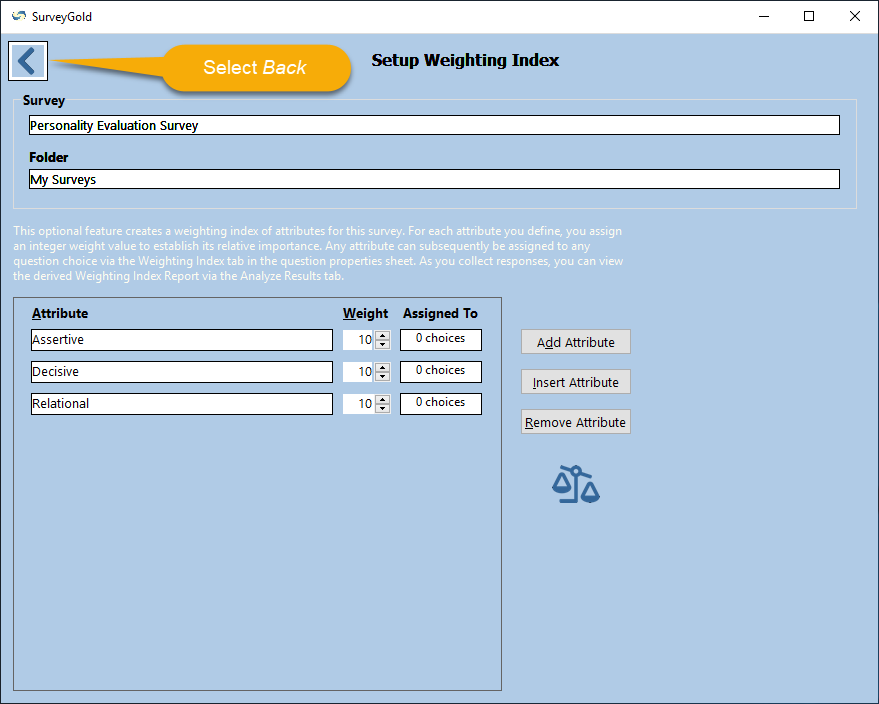
The following example shows how to setup the attributes for your survey. It is followed by an example of how to assign those attributes to question response choices.
Note: Producing reports based on your weighting index settings is achieved by performing the List Weighting Index action in the Analyze Results tab.
SurveyGold optionally provides the ability to define a set of attributes (such as "cost", "dependability", "accuracy", etc.) and associate them with your survey via the survey properties sheet. You can then assign any one of these attributes to a question choice along with an integer score (positive or negative) via the question properties sheet. Theses attributes can be assigned before, during or after the survey responses are collected into SurveyGold.
In this context, the survey is an instrument intended to measure one or more quantitative attributes. Each question response has one or more integer values (positive or negative) associated with a particular attribute. Upon submission of all responses to a survey, these integer values can be aggregated to determine the quantitative value of each attribute.
Examples of this kind of survey application include:
- Meyers-Briggs, DISC or other similar personality profiles.
- Business retention and expansion surveys assessing characteristics such as risk, incentives, etc.
- School, employee, team, work-life climate surveys
The formula used to derive the weighting index for a given attribute is as follows:
weighting index for attribute = score x attribute weight
The following example shows how to setup the attributes for your survey. It is followed by an example of how to assign those attributes to question response choices.
Note: Producing reports based on your weighting index settings is achieved by performing the List Weighting Index action in the Analyze Results tab.
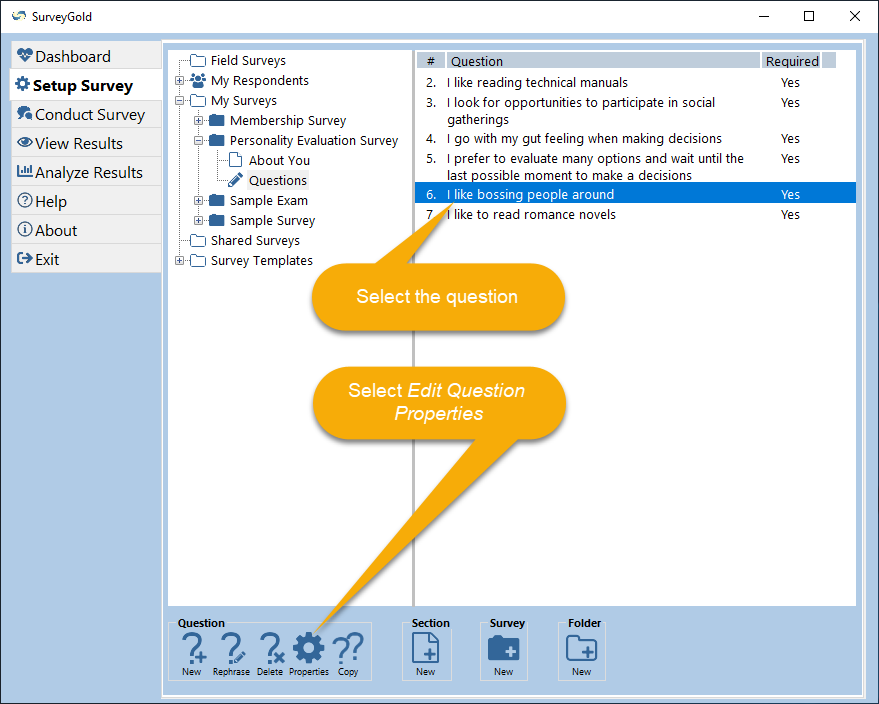
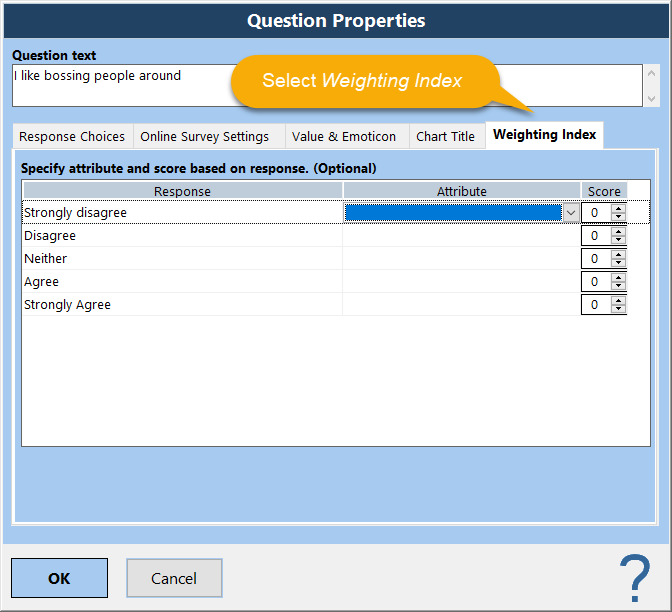
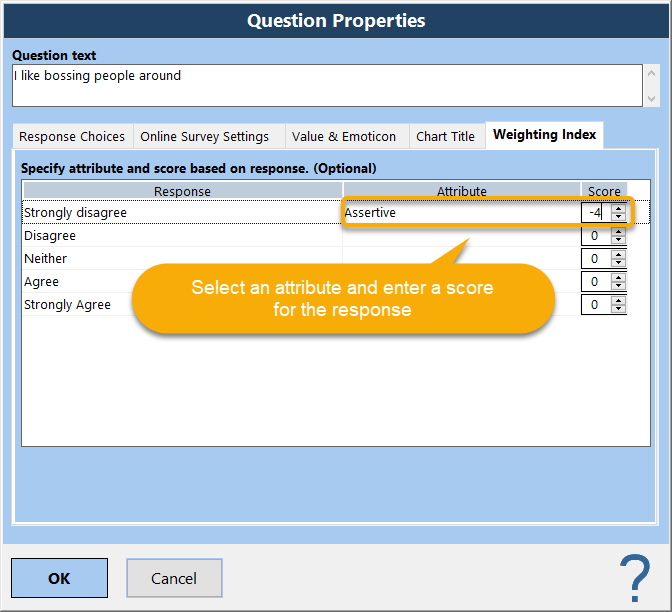
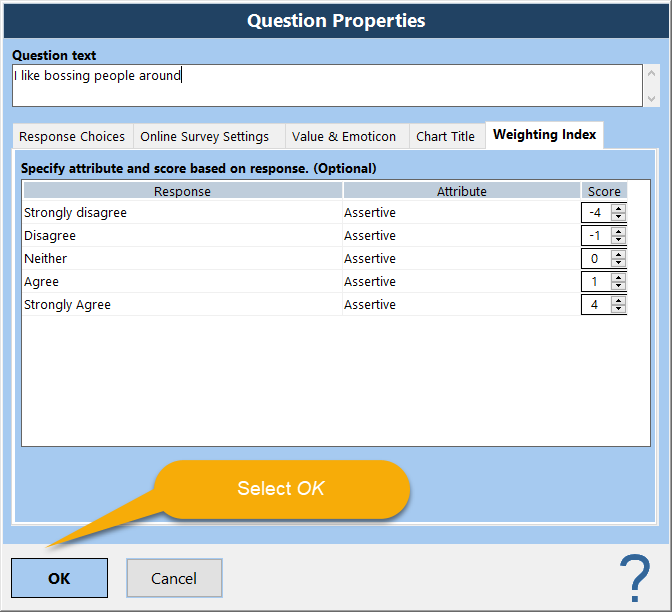
After defining your weighting index attributes, you can then assign these attributes to question response choices. The following example shows how to do this with a question that already has response choices defined. You could, of course, define the response choices and assign weighting index attributes to those choices all at the same time. However, for the sake of clarity, this example assumes that response choices have already been defined.
Locking Your Survey to Prevent Modification or Access to Optimal Answers
SurveyGold provides an easy way for you to lock your survey so that you (or others) cannot modify or access the structure or contents of the survey, sections or any of its questions from within the Setup Survey feature. A survey may be locked with or without a password. If a password is used, the password must be entered to subsequently unlock the survey.
Locking a survey makes it unalterable once it has been finalized and approved. You may not necessarily use a password when you are locking a survey for this reason. Locking a survey also prevents others from viewing the optimal responses to surveys that you intend to use as an exam or test. For this reason, you would normally want to use a password when you are locking a survey used as an exam or test.
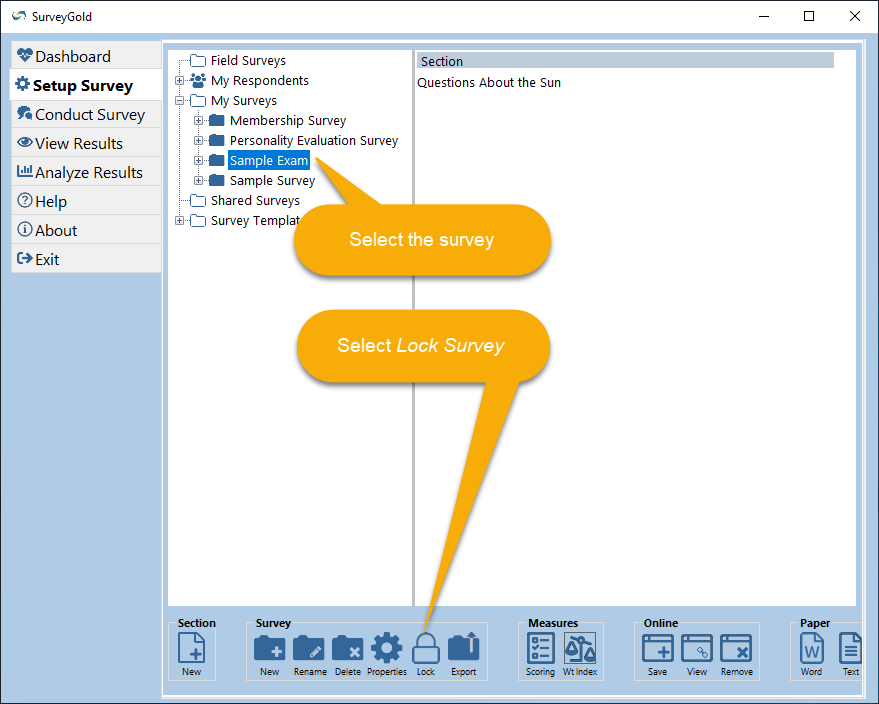
The following example shows you how to lock a survey using a password.
|
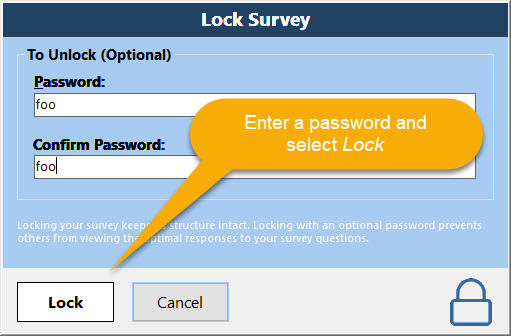
Step 2 - When the Lock Survey window appears, enter a password in the first field. This password will be required to subsequently unlock the survey. Verify you password by entering it again in the second field. Then select OK.
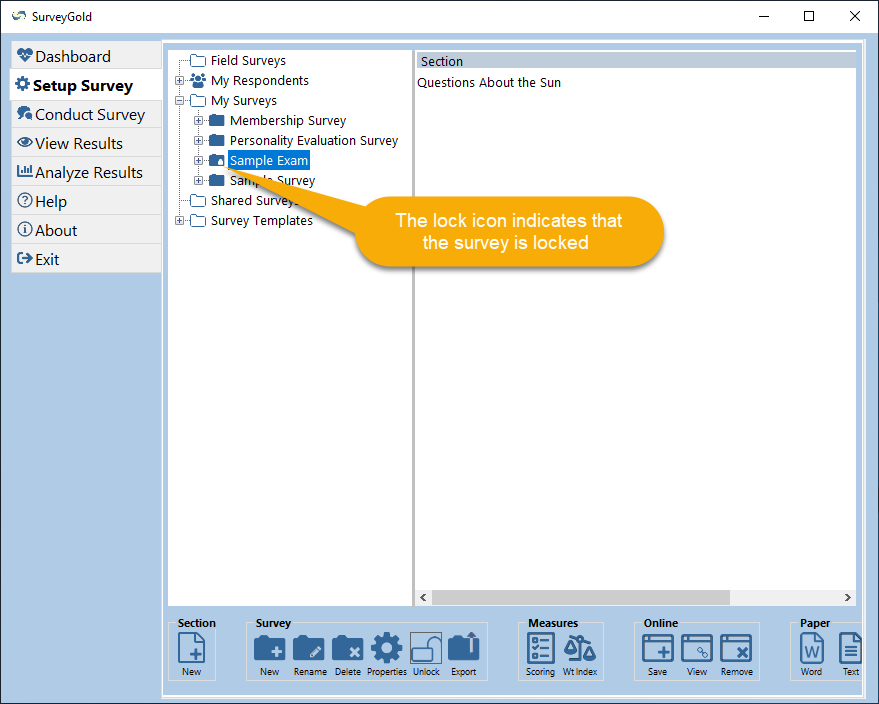
SurveyGold returns you to the Setup Survey tab. Note that a picture of a lock appears next to your survey denoting that your survey is now locked. Note: Using a password is optional. If you do not specify a password when locking your survey, then no password is required to unlock your survey from within the Setup Survey feature. |
Unlocking a Locked Survey
Locking a survey prevents it from being altered. It also prevents sensitive data, such as optimal response choices for graded questionnaires, from being seen without permission. A survey may be locked with or without a password. If a password is used, the password must be entered to subsequently unlock the survey.
If you are a survey author and wish to alter a locked survey, it is necessary to unlock the survey. If you have imported a survey from a survey definition file, the survey that you have imported is locked with a password and the password must be acquired from the original author before you can unlock the survey.
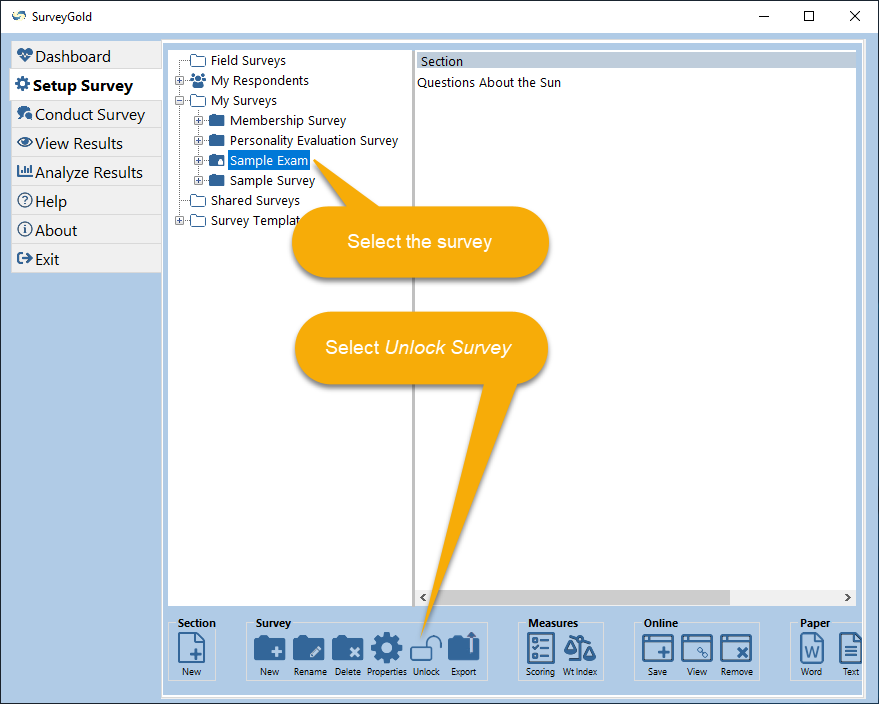
The following example shows you how to unlock a survey using a password
|
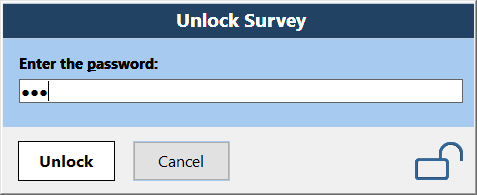
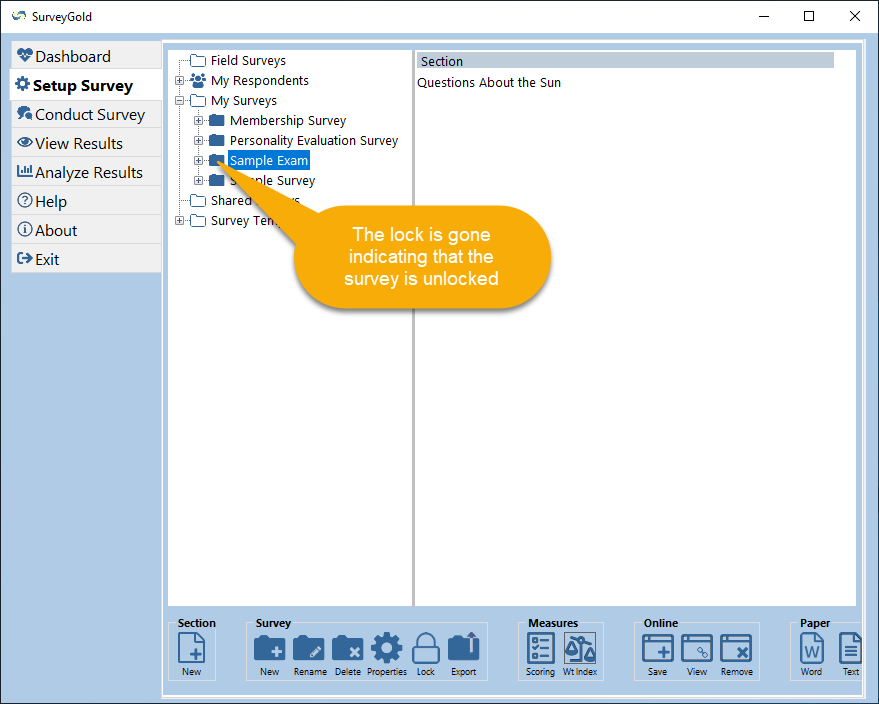
Step 2 - When the Unlock Survey window appears, enter the password to unlock the survey. Then select OK. SurveyGold returns the Setup Survey tab. Note that a picture of a lock no longer appears next to your survey denoting that your survey is unlocked.
Note: If you did not specify a password when you locked your survey, then no password is required to unlock your survey from within the Setup Survey tab. Consequently, in that case the Unlock Survey window does not appear. |
Reusing a Section or Question from Another Survey
You can quickly create new surveys by reusing sections or questions from any other survey. The following example explains how to copy a question from another survey.
You can quickly create new surveys by reusing sections or questions from any other survey. The following example explains how to copy a question from another survey.
|
Step 1 - From the Setup Survey tab folder, select + next to your survey. This expands your survey displaying all its sections. Select the section that contains the question you want to copy to another survey. The example here demonstrates selecting the "Sample Survey" and selecting the "About You" section.
|
|
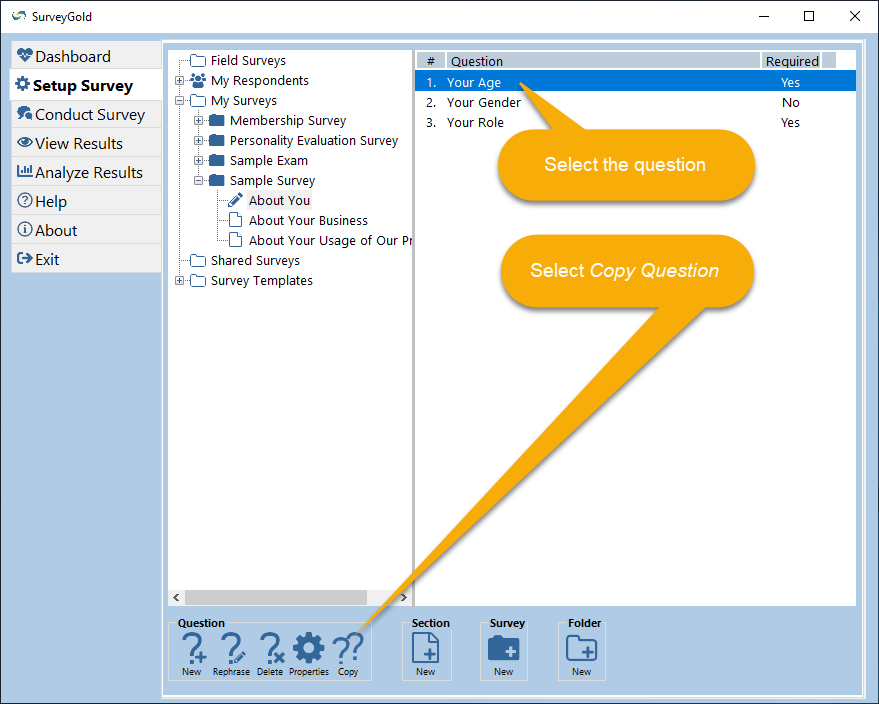
Step 2 - From the list on the right, select the question you want to copy and select "Copy to a Survey Section from the popup menu. The example here demonstrates selecting the "Your Age" question to copy.
Note: Although this example shows how to copy one question at a time, it is possible to copy multiple questions at a time. To do so, simply select multiple questions by holding down CTRL key and selecting each of the questions you want to copy. If you have already selected multiple questions to copy, simply perform the select "Copy to a Survey Section" action from button bar. |
|
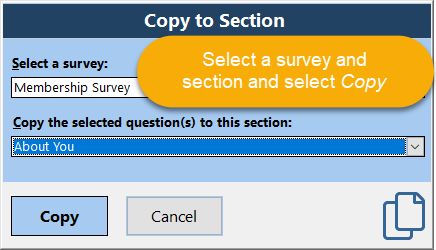
Step 3 - Next, the Copy To Section window appears. From the first list, select the survey to receive the question(s) you selected. When you select a survey from the first list, the second list displays a list of all sections in that survey. From the second list, select the section to receive the question(s) you selected. Select OK to copy the selected question to the specified survey and section.
Then, using folder view the left side, select the section that received your copied question(s). You will see the newly copied question(s) in that section. |
Note: When you copy a question from one survey to another, all of the question properties (except Skip To Question Based On Response) are copied as well. That means that if the question you are copying has choices, they are included in the question when it is copied to a new survey. When you copy a section from one survey to another, all of the questions within that section are copied to the new survey.
Note: You can also use drag-and-drop to move or copy a section to another survey or a question to another survey. Simply drag the question or section from the list on the right on to a survey or section on the left.
Note: You can also use drag-and-drop to move or copy a section to another survey or a question to another survey. Simply drag the question or section from the list on the right on to a survey or section on the left.
Reordering Sections or Questions
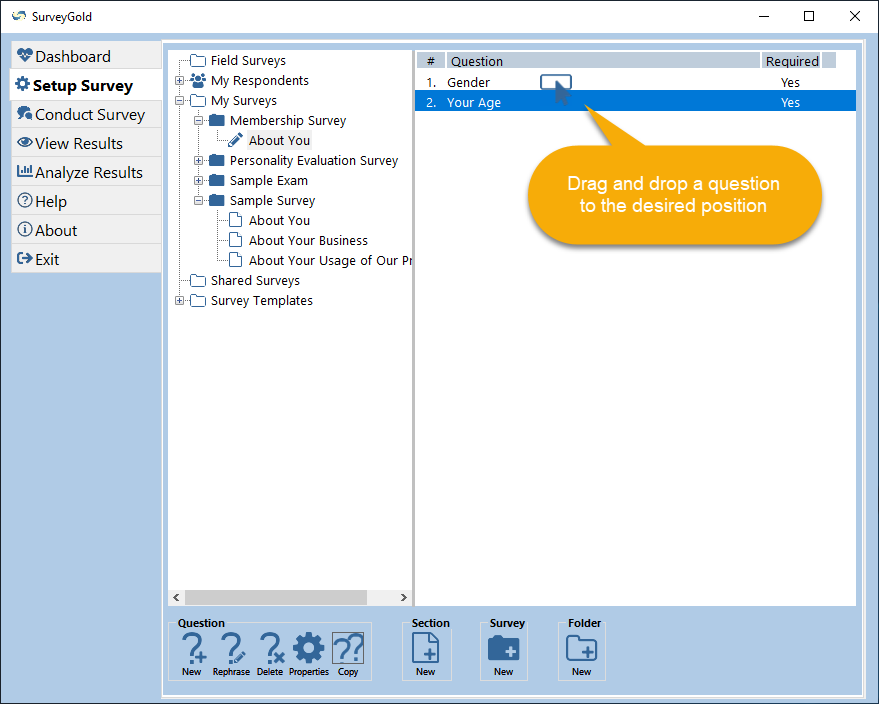
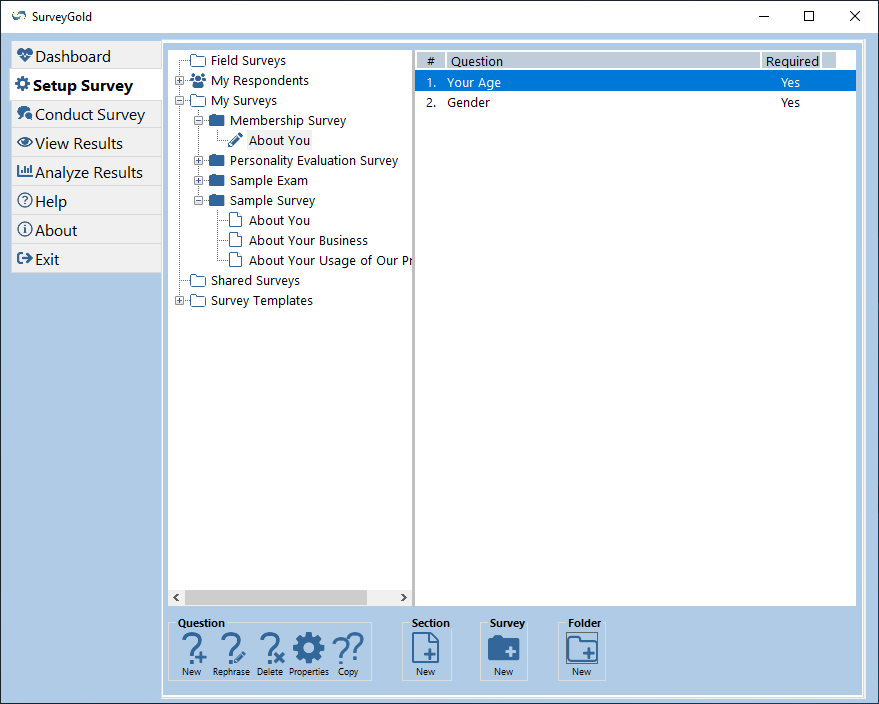
Changing the sequence of sections or questions is accomplished by dragging a section or question and dropping it to a new position.
Changing the sequence of sections or questions is accomplished by dragging a section or question and dropping it to a new position.
|
Step 1 - From the view on the left, select a section that contains the question that you want to reorder. Then, using the list on the right, drag the question you want to reorder to the desired position. Then drop it.
Note: The process of reordering a section is identical to this. The only difference is that you begin by first selecting your survey. Then, you use the view of sections on the right to reorder your sections. |
Skipping to Another Section or Question Based on a Response
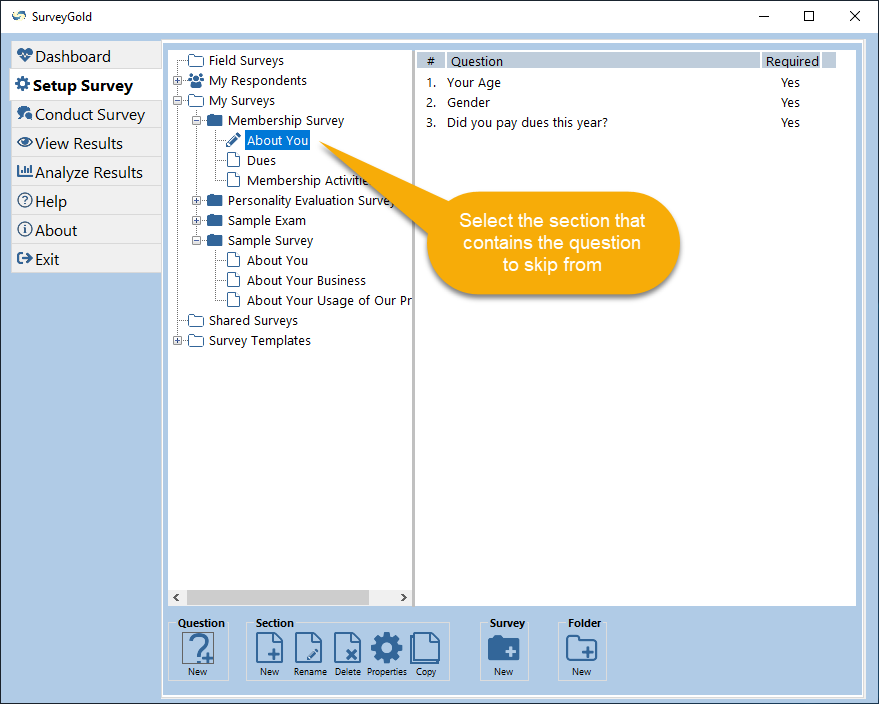
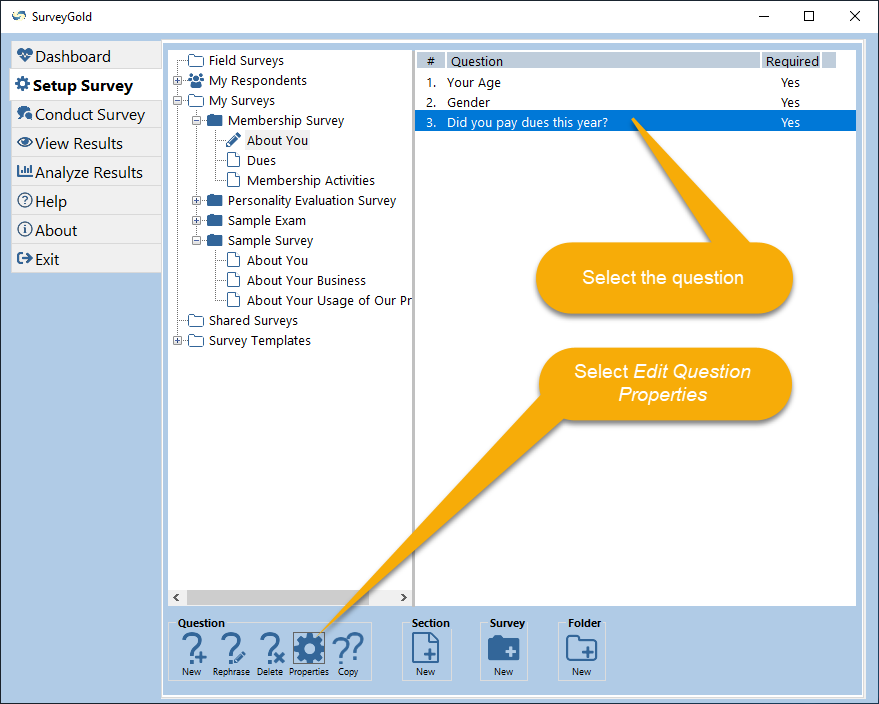
You may want the flow of questions to change depending upon the response given by a respondent to a particular question. In the following example, a question regarding payment of membership dues causes the flow of questions to go to one of two question.
Note: The following steps can only be accomplished if the question has choices and only one response is allowed. If the question properties do not meet those two criteria, then skipping is not allowed.
|
Step 1 - From the Setup Survey tab folder, select + next to your survey. This expands your survey displaying all its sections. Select the section that contains the question you want to skip from to another question or section. The example demonstrates selecting the "Membership Survey" and selecting the "About You" section.
|
|
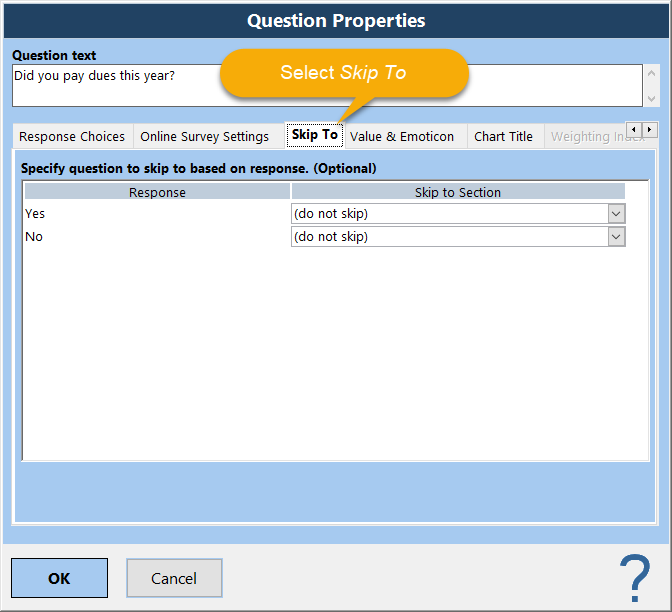
Step 3 - Select the Skip To tab. Notice that for every response choice, there is an associated Skip To Section.
Note: The Skip To tab is only enabled if 1 is entered in the "Number of responses allowed" field in the Response Choices tab. Note: If the check-box "Enable the multi-page feature where each section appears on its own page." is un-checked in the survey properties sheet, the Skip To Question appears rather than Skip To Section. This is because a single-page online survey forms skip to questions rather than to sections. A video tutorial is available that describes step-by-step how to skip from one section to another. |
|
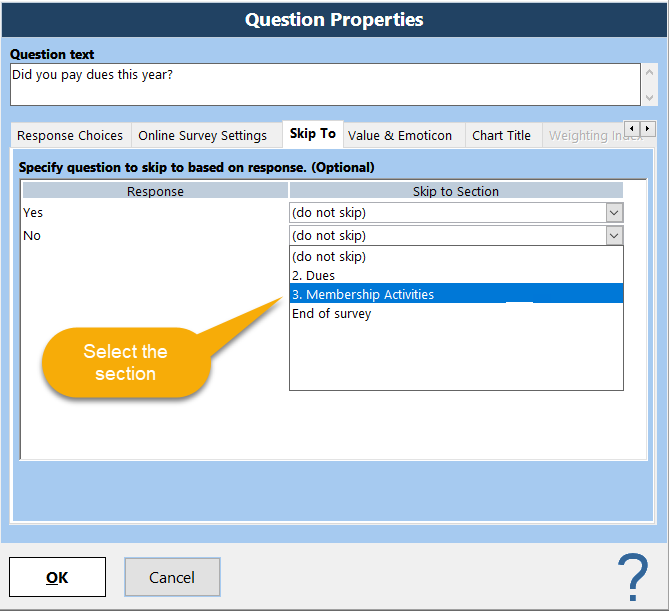
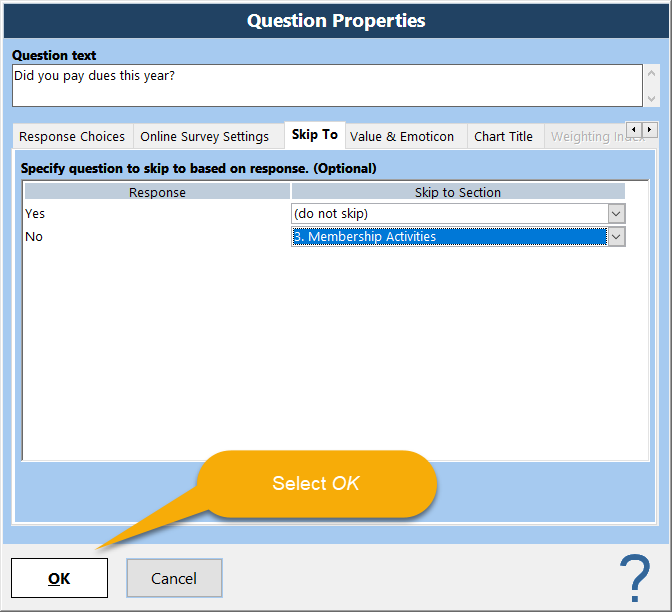
Step 4 - This example demonstrates skipping over the next section (Dues #2) if the response choice selected by the respondent is "No". To accomplish this, in the Skip To Section column, select the down arrow in the "No" response row and select section #3 from the list. Select OK to save changes. This closes the question properties sheet and returns control to the Setup Survey tab folder.
|
Copying Your Survey
Duplicating an existing survey so that you can use it as a basis for another use is easy.
Duplicating an existing survey so that you can use it as a basis for another use is easy.
|
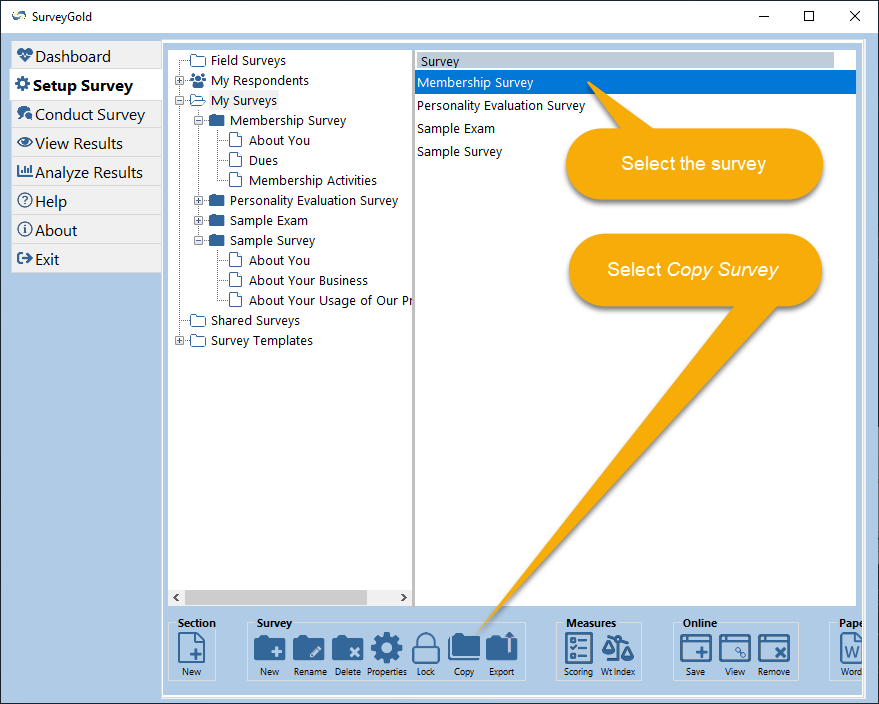
Step 1 - In the Setup Survey tab, select the folder that contains the survey that you want to copy. From the list on the right, select the survey to be copied and perform the Copy Survey action in the button bar.
Note: Windows users can right-click on the survey and perform the Copy Survey action in the popup menu. |
|
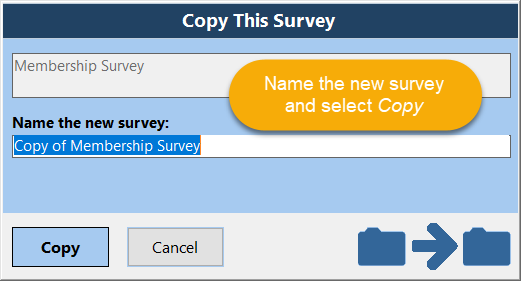
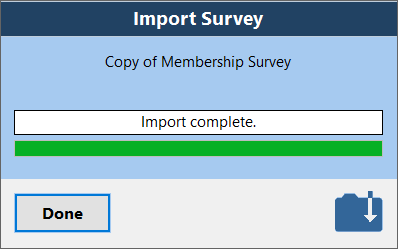
Step 2 - Enter the name of the survey to be created. Specify whether or not to include existing responses when creating the copy of the survey. Select OK to begin the copy process. A status window appears as the copy process progresses. When the process is complete, select OK in the status window to see the newly-created copy of your survey in the list of surveys.
|
Deleting Your Survey
Deleting an existing survey that you no longer use is easy.
Deleting an existing survey that you no longer use is easy.
|
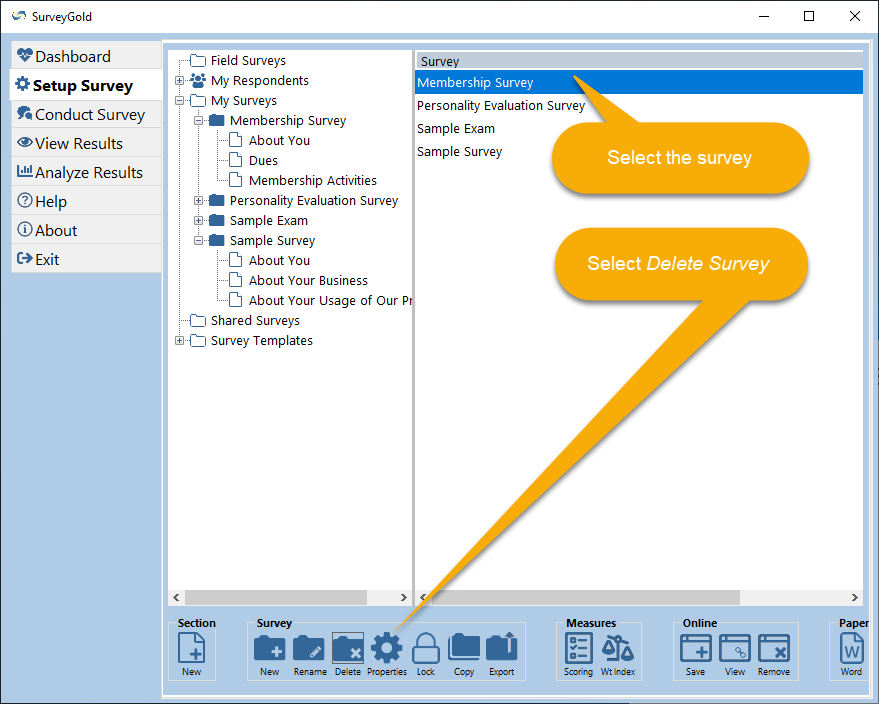
Step 1 - In the Setup Survey tab, select the folder that contains the survey that you want to delete. From the list on the right, select the survey to be deleted and perform the Delete Survey action in the button bar.
Note: Windows users can right-click on the survey and perform the Delete Survey action in the popup menu. |

